Android自定义View实例之横向进度轴

一些心里话

自定义View作为Android程序开发过程中,初阶到中阶晋级的关键性标志,一直是很多Android程序员学习的必经之路,有很多同行在遇到自定义View后选择了知难而退,这就造成了一个现象,那就是这些程序员只会拿别人造好的轮子修修补补,而从不知道一个轮子该如何造出来,这样不好。

虽然我也不建议大家都重复的造轮子,毕竟你造出来的未必比别人好,造好了也花费大量时间,拖延了项目进度,但是知道如何造轮子这件事肯定是很重要的,不能因噎废食,毕竟自定义View涉及的知识点非常多且复杂,只有掌握了难度较高的技能,你才能在红利期已过的移动开发中走的更远,爬的更高,毕竟这个行业虽算不上弱肉强食,但是优胜略汰的自然法则还是有的。

好了,叭叭了这么多,目的不是说教,而是希望每个人都能看清自己未来的路,有所追求也学会取舍。

说说这个自定义View

自定义View其实没啥好说的,直接看效果图即可:
logo
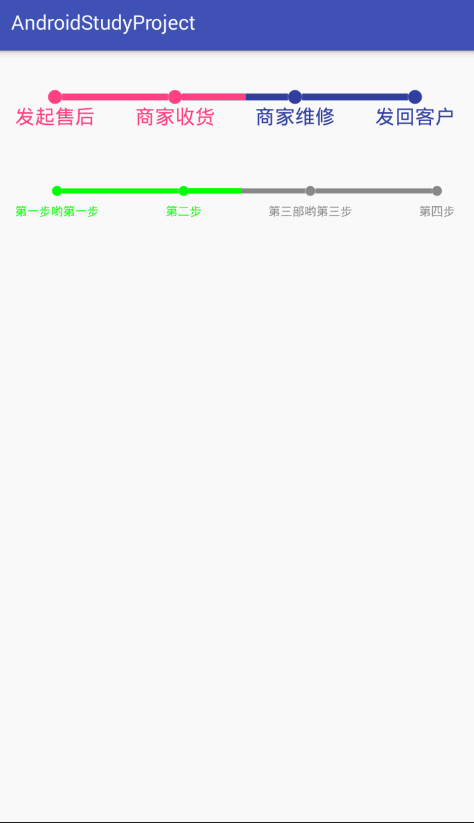
大概就是这个样子了,有几处需要简单说明一下:

1.可以自定义圆形的大小
2.可以自定义连接线的粗细
3.可以自定义完成和未完成的颜色
4.可以自定义阶段文字的大小
5.可以添加点击事件
6.支持设置进度线在两个圆形之间
(比如:设置步数为2.3,从0开始画点则会在点2和点3之间有一个完成度为百分之30的完成线)

基本上自定义View就是这个样子了,适合一些进度周期较短的业务,比如:周期较短的售后业务或者开发流程等进度轴。

自定义View的绘制思路

每做一个自定义View我们必须养成一个习惯,那就是先考虑绘制思路,自定义View的过程其实就是利用Android给的画笔(Paint)和自定义的属性值(attrs.xml)再根据一定的测量规则(onMeasure)以及绘制流程(onDraw)利用一些算法(贝塞尔曲线等)在画布(Canvas)上绘制的过程,所以在你不需要学习一些画画的基本功的前提下(Paint和Canvas都帮你做了),如何构图就成了一个程序员绘制自定义View的关键。

构图,看似触手可及但实际上虚无缥缈,这是一个创作的过程,创作就是痛苦的过程(天才除外)。

现在回到我们的自定义View吧,要绘制一个横向的进度轴,最关键的几个问题:

1.如何绘制点?
2.如何绘制线?
3.第一个点左边留白多少?
4.第二个点右边留白多少?
5.自定义测量的宽度和高度应该怎么计算?

问题其实不多,绘制点和线Canvas都有现成的方法,不用操心,关键是第一个点的左边留白和最后一个点的右边留白,因为我开始画的时候简单的认为只要留出圆形的半径就行了,结果发现下面的字比圆形宽的时候,字就超出界面了,所以得考虑字和半径的宽度,取比较宽的那个值进行留白,自定义测量的宽度和高度我是这么设计的:宽度为手机宽度,除非你写了具体值,高度为圆的直径加上两个字的高度再加上padding。

这样就把这个自定义View的框架搭建好了,然后考虑的就是如何连线以及如何画未完成的延长线了:

1.连线很简单,只要确定步数大于1,然后让总宽度减去左右留白的宽度和起始及结束两个圆的直径,剩下的宽度在除以点数-1来算出每条连接线的长度,再将线连接起来即可。

2.未完成进度的延长线的思路就是,得到这个步数最大的步数,在这个步数对应的圆形之后绘制一条连接线长度百分比长度的完成线覆盖即可。

当然还要考虑自定义View设置点击事件并对外提供接口以及点击事件判断点击点是否在时间轴的圆形上并重新绘制完成和未完成的界面等等。

这个思路写出来可能很难描述清楚,如果看不懂或者看迷糊了那肯定是我表达不好,不用担心,继续往下看,代码会告诉你一切,Talking Is Cheap!

代码如何实现

第一步:在values文件夹里加入attrs.xml文件,用来存放自定义View用到的自定义属性,主要目的是在布局文件中就可以设置自定义属性的值,方便开发者设置。

1
2
3
4
5
6
7
8
9
10
<?xml version="1.0" encoding="utf-8"?>
<resources>
<declare-styleable name="TimeLineView">
<attr name="textSize" format="dimension"/>
<attr name="tlradius" format="dimension"/>
<attr name="lineWidth" format="dimension"/>
<attr name="CompleteColor" format="color"/>
<attr name="NoCompleteColor" format="color"/>
</declare-styleable>
</resources>

这个操作如果看不懂,就得自己去学了,主要学习自定义属性方面的知识。

第二步:开始编写自定义View的代码,融入刚才的思路,注释我已经写的非常好了(个人认为),请认真阅读,带着刚才我描述的稀里糊涂的思路也可以。

1
2
3
4
5
6
7
8
9
10
11
12
13
14
15
16
17
18
19
20
21
22
23
24
25
26
27
28
29
30
31
32
33
34
35
36
37
38
39
40
41
42
43
44
45
46
47
48
49
50
51
52
53
54
55
56
57
58
59
60
61
62
63
64
65
66
67
68
69
70
71
72
73
74
75
76
77
78
79
80
81
82
83
84
85
86
87
88
89
90
91
92
93
94
95
96
97
98
99
100
101
102
103
104
105
106
107
108
109
110
111
112
113
114
115
116
117
118
119
120
121
122
123
124
125
126
127
128
129
130
131
132
133
134
135
136
137
138
139
140
141
142
143
144
145
146
147
148
149
150
151
152
153
154
155
156
157
158
159
160
161
162
163
164
165
166
167
168
169
170
171
172
173
174
175
176
177
178
179
180
181
182
183
184
185
186
187
188
189
190
191
192
193
194
195
196
197
198
199
200
201
202
203
204
205
206
207
208
209
210
211
212
213
214
215
216
217
218
219
220
221
222
223
224
225
226
227
228
229
230
231
232
233
234
235
236
237
238
239
240
241
242
243
244
245
246
247
248
249
250
251
252
253
254
255
256
257
258
259
260
261
262
263
264
265
266
267
268
269
270
271
272
273
274
275
276
277
278
279
280
281
282
283
284
285
286
287
288
289
290
291
292
293
294
295
296
297
298
299
300
301
302
303
304
305
306
307
308
309
310
311
312
313
314
315
316
317
318
319
320
321
322
323
324
325
326
327
328
329
330
331
332
333
334
335
336
337
338
339
340
341
342
343
344
345
346
347
348
349
350
351
352
353
354
355
356
357
358
359
360
361
362
363
364
365
366
367
368
369
370
371
372
373
374
375
376
377
378
379
380
381
382
383
384
385
386
387
388
389
390
391
392
393
394
395
396
397
398
399
400
401
402
403
404
405
406
407
408
409
410
411
412
413
414
415
416
417
418
419
420
/**
* @author 贾真
*/

public class TimeLineView extends View {
/*
定义画笔
*/

private Paint mPaint;
/*
延长线专用画笔
*/

private Paint exPaint;
/*
字体大小
*/

private float mTextSize;
/*
圆形半径
*/

private float mRadius;
/*
线的粗度
*/

private float mLineWidth;
/*
完成的颜色
*/

private int mCompleteColor;
/*
未完成的颜色
*/

private int mNoCompleteColor;
/*
当前执行到的步数 从0开始计算
*/

private float mStep=0;
/*
* 传入的文字的list
*/

private List<String> pointStringList;
/*
* 每个点的X坐标
*/

private Float[] pointXArray;
/*
* 文字高度
*/

private float mTextHeight;

/*
自定义的节点点击事件
*/

OnTimeLineStepClickListener onTimeLineStepClickListener;

/*
存放圆心的列表
*/

List<CircleCenter> circleCenterList;

/*
* 点与点之间的阶段长度
*/

float sectionLength;

/*
计算保留两位小数用的工具类
*/

BigDecimal bigDecimal;
public TimeLineView(Context context) {
this(context,null);
}

public TimeLineView(Context context, @Nullable AttributeSet attrs) {
this(context, attrs,0);
}

public TimeLineView(Context context, @Nullable AttributeSet attrs, int defStyleAttr) {
super(context, attrs, defStyleAttr);
initAttr(attrs);
init();
}

/**
* 初始化自定义属性的
* @param attrs attrs.xml里定义的属性
*/

private void initAttr(AttributeSet attrs){
if (attrs != null) {
TypedArray typedArray = getContext().obtainStyledAttributes(attrs, R.styleable.TimeLineView);
mTextSize = typedArray.getDimension(R.styleable.TimeLineView_textSize, 20);
mRadius = typedArray.getDimension(R.styleable.TimeLineView_tlradius,20);
mLineWidth=typedArray.getDimension(R.styleable.TimeLineView_tlradius,5);
mCompleteColor=typedArray.getColor(R.styleable.TimeLineView_CompleteColor,Color.GREEN);
mNoCompleteColor=typedArray.getColor(R.styleable.TimeLineView_NoCompleteColor,Color.GRAY);
//切记回收防止内存泄漏
typedArray.recycle();
}
}

/**
* 初始化画笔、字体高度、传入步数文字内容的列表以及圆心的列表
*/

private void init(){
mPaint=new Paint();
mPaint.setAntiAlias(true);
mPaint.setTextSize(mTextSize);
mPaint.setStrokeWidth(mLineWidth);
exPaint=new Paint();
mTextHeight=mPaint.descent() -mPaint.ascent();
pointStringList=new ArrayList<>();
pointStringList.add("第一步");
pointStringList.add("第二步");
pointStringList.add("第三步");
circleCenterList=new ArrayList<>();
}

/**
* 自定义的测量方式 主要处理的是wrap_content模式下的一些默认值
* 宽度是不管如何设置都是占用的整个屏幕的宽度,这里可以自行调整
* 高度是两倍字体的高度加上圆的直径 作为默认高度,如果有需求也可以自行调整
* @param widthMeasureSpec 宽度尺
* @param heightMeasureSpec 高度尺
*/

@Override
protected void onMeasure(int widthMeasureSpec, int heightMeasureSpec) {
super.onMeasure(widthMeasureSpec, heightMeasureSpec);
final int minimumWidth = getSuggestedMinimumWidth();
final int minimumHeight = getSuggestedMinimumHeight();
int width = measureWidth(minimumWidth, widthMeasureSpec);
int height = measureHeight(minimumHeight, heightMeasureSpec);
setMeasuredDimension(width, height);
}

/**
* 测量宽度
* @param defaultWidth 默认宽度
* @param measureSpec 宽度尺
* @return 计算后的宽度
*/

private int measureWidth(int defaultWidth, int measureSpec) {

int specMode = MeasureSpec.getMode(measureSpec);
int specSize = MeasureSpec.getSize(measureSpec);


switch (specMode) {
case MeasureSpec.AT_MOST:
defaultWidth = getWidth();
break;
case MeasureSpec.EXACTLY:
defaultWidth = specSize;
break;
case MeasureSpec.UNSPECIFIED:
defaultWidth = Math.max(defaultWidth, specSize);
}
return defaultWidth;
}

/**
* 高度测量
* @param defaultHeight 默认高度
* @param measureSpec 高度尺
* @return 计算后的高度
*/

private int measureHeight(int defaultHeight, int measureSpec) {

int specMode = MeasureSpec.getMode(measureSpec);
int specSize = MeasureSpec.getSize(measureSpec);
switch (specMode) {
case MeasureSpec.AT_MOST:
defaultHeight = (int) (2*mTextHeight+(mRadius*2)) + getPaddingTop() + getPaddingBottom();
break;
case MeasureSpec.EXACTLY:
defaultHeight = specSize;
break;
case MeasureSpec.UNSPECIFIED:
defaultHeight = Math.max(defaultHeight, specSize);
break;
}
return defaultHeight;
}
/**
* 绘制思路:
* 1.确定第一步骤的圆形和文字的宽度,哪个宽就用哪个作为第一步绘制的左边距离
* 2.确定最后步骤的圆形和文字的宽度,那个宽就用哪个最为最后一个步骤绘制的右边距离
* 3.用自定义组件整体的宽度减去左边距和右边距再加上两个半径的距离,剩下的就是要平分剩下点的距离
* 4.平分剩下的距离,画圆后连线。
*/

@Override
protected void onDraw(Canvas canvas) {
super.onDraw(canvas);
//先判断传入的步数是不是大于0,如果传入一个空数据的List则不调用显示步数的方法
if(pointStringList.size()>0){
//先设置成完成后的颜色,因为绘制过程肯定是先绘制完成后的颜色且传入的步数至少有一步是完成的
mPaint.setColor(mCompleteColor);
initViewsPos();
//当前绘制到那一步
int currentStep;
//是否绘制半截进程的线 如2.3就绘制第三步到第四步的百分之30的完成线
boolean isDrawExtrasLine=false;
//循环X轴的点进行绘制
for(int i=0;i<pointXArray.length;i++){
currentStep= i;
//当前的步骤大于设置的步骤了就需要将线和圆改成未完成色,如果要绘制未完成色就说明可能要绘制延长线,那就将绘制延长线的开关打开。
if(currentStep >mStep){
mPaint.setColor(mNoCompleteColor);
isDrawExtrasLine=true;
}
drawCirlceAndText(canvas,pointStringList.get(i),pointXArray[i]);
//当i大于1说明有起码两个点时才有必要画线
if(i>=1){
drawLine(canvas,pointXArray[i-1],pointXArray[i]);
}
}
//绘制延长线,主要是处理步数为类似2.3时,这百分之30的第三个圆到第四个圆之间的完成颜色的线
if(isDrawExtrasLine){
bigDecimal =new BigDecimal(mStep);
float mStepTwoPoint =bigDecimal.setScale(2, BigDecimal.ROUND_HALF_UP).floatValue();
//取小数点后的数字
float littleCountFloat=mStepTwoPoint-(int)mStepTwoPoint;
drawExtrasLine(canvas,littleCountFloat);
}
}else{
mPaint.setColor(Color.RED);
String noStepsWarnText="传入步数为0,请重新传入数据";
canvas.drawText(noStepsWarnText,(getWidth()/2)-mPaint.measureText(noStepsWarnText)/2,getHeight() - this.mRadius - 1,mPaint);
}
}

/**
* 初始化组件的位置
* 主要是计算各个圆形的位置
* 并将其圆心位置记录到数组中去
*/

private void initViewsPos(){
//传入的步数
int pointCount= pointStringList.size();
pointXArray=new Float[pointCount];
//如果文字的长度大于半径 就用文字的长度来计算 开始的点和结束的点同理
float startDistance=Math.max(mRadius,mPaint.measureText(pointStringList.get(0))/2);
float endDistance=Math.max(mRadius,mPaint.measureText(pointStringList.get(pointStringList.size()-1))/2);
//每段线的距离 宽度减去左留白和右留白后除以点数减一即可 帮助思考的图例:*---*---*---*
sectionLength=(getWidth()-startDistance-endDistance)/(pointCount-1);
//循环将起始点、结束点和中间的点的X的值放入数组中
for(int i=0;i<pointCount;i++){
if(i==0){
pointXArray[i]=startDistance;
}else if(i==pointCount-1){
pointXArray[i]=getWidth()-endDistance;
}else{
pointXArray[i]=startDistance+sectionLength*i;
}
}
}

/**
* 绘制圆形和下面的文字
* @param canvas 画布
* @param text 文字内容
* @param x x轴的值
*/

private void drawCirlceAndText(Canvas canvas,String text,float x){
canvas.drawCircle(x,getHeight()- this.mRadius * 2 - 30,mRadius,mPaint);
//将每个圆的圆心加入到列表中去
circleCenterList.add(new CircleCenter(x,getHeight()- this.mRadius * 2 - 30));
Log.e("mTextHeight:",mTextHeight+"");
canvas.drawText(text,x-mPaint.measureText(text)/2,getHeight() - this.mRadius - 1,mPaint);
}

/**
* 绘制两圆之间的连接线 总数为点数-1
* @param canvas 画布
* @param startX 线开始的X轴的值
* @param endX 线结束的X轴的值
*/

private void drawLine(Canvas canvas,float startX,float endX){
canvas.drawLine(startX+mRadius,getHeight()- this.mRadius * 2 - 30,endX-mRadius,getHeight()- this.mRadius * 2 - 30,mPaint);

}

/**
* 绘制多余的小数线段
* 这里的绘制原理是 计算百分比并找到完成步数的值 并在其之后 绘制一条完成颜色的线 该线的长度是一个线段乘以完成的百分比
* @param canvas 画布
* @param percent 完成的百分比
*/

private void drawExtrasLine(Canvas canvas,float percent){
//找到最大步数的圆形的X轴
float maxGreenPointX= pointXArray[(int)mStep];
//设置延长线专用Paint的颜色和宽度
exPaint.setColor(mCompleteColor);
exPaint.setStrokeWidth(mLineWidth);
canvas.drawLine(maxGreenPointX+mRadius,getHeight()- this.mRadius * 2 - 30,maxGreenPointX+mRadius+sectionLength*percent,getHeight()- this.mRadius * 2 - 30,exPaint);

}

/**
* 传参的方法,对外开放
* @param mpointStringArray 传入的步骤的数组(这里之所以用数组是因为可以使用@Size注解)
* @param step 传入的完成步骤数
*/

public void setPointStrings(@Size(min = 2) String[] mpointStringArray, @FloatRange(from = 1.0) float step) {
if (mpointStringArray.length==0) {
pointStringList.clear();
circleCenterList.clear();
mStep = 0;
} else {
pointStringList = Arrays.asList(mpointStringArray);
mStep = Math.min(step, pointStringList.size());
invalidate();
}
}

/**
* 动态设置步数的方法
* @param step 步数
*/

public void setStep(@FloatRange(from = 1.0) float step){
mStep = Math.min(step, pointStringList.size());
invalidate();
}

/**
* 手势方法重写 返回true来消费此方法
* 原理是当手指抬起时 计算点击的点是不是在步骤圆形中的某一个范围内,如果在就触发自定义点击事件
* @param event 点击事件
* @return true 消费事件
*/

@SuppressLint("ClickableViewAccessibility")
@Override
public boolean onTouchEvent(MotionEvent event) {
float x = event.getX();
float y = event.getY();
int action = event.getAction();
switch (action) {
case MotionEvent.ACTION_DOWN:
break;
case MotionEvent.ACTION_MOVE:
break;
case MotionEvent.ACTION_UP:
if (x + getLeft() < getRight() && y + getTop() < getBottom()) {
int clickStep=isInTheCircles(x,y);
if(clickStep>=0&&onTimeLineStepClickListener!=null)
onTimeLineStepClickListener.onStepClick(clickStep);
}
break;
}
return true;

}

/**
判断点击位置是否在多个圆中的某一个内
* @param x 点击事件的x轴
* @param y 点击事件的y轴
* @return boolean是否在某圆内:是 true,否 false
*/

private int isInTheCircles(float x,float y){
int clickStep=-1;
for(int i=0;i<circleCenterList.size();i++){
CircleCenter circleCenter=circleCenterList.get(i);
//点击位置x坐标与圆心的x坐标的距离
float distanceX = Math.abs(circleCenter.getX()-x);
//点击位置y坐标与圆心的y坐标的距离
float distanceY = Math.abs(circleCenter.getY()-y);
//点击位置与圆心的直线距离
int distanceZ = (int) Math.sqrt(Math.pow(distanceX,2)+Math.pow(distanceY,2));
//如果点击位置与圆心的距离小于等于圆的半径,证明点击位置有在圆内
if(distanceZ <= mRadius){
clickStep=i;
break;
}
}
return clickStep;
}

/*
设置接口的方法 对外提供调用
*/

public void setOnTimeLineStepChangeListener(OnTimeLineStepClickListener onTimeLineStepClickListener){
this.onTimeLineStepClickListener=onTimeLineStepClickListener;
}

/**
* 点击事件的接口定义
*/

public interface OnTimeLineStepClickListener {

void onStepClick(float step);
}

/**
* 圆心的内部实体类
* 主要为是判断点击事件是否在圆上提供的Bean
*/

class CircleCenter{
float x;
float y;

private CircleCenter(float x,float y){
this.x=x;
this.y=y;
}
private float getX() {
return x;
}

public void setX(float x) {
this.x = x;
}

private float getY() {
return y;
}

public void setY(float y) {
this.y = y;
}
}
}

第三步:布局文件 没啥可说的

1
2
3
4
5
6
7
8
9
10
11
12
13
14
15
16
17
18
19
20
21
22
23
24
25
26
27
<?xml version="1.0" encoding="utf-8"?>
<LinearLayout
xmlns:android="http://schemas.android.com/apk/res/android"
xmlns:app="http://schemas.android.com/apk/res-auto"
android:layout_width="match_parent"
android:layout_height="match_parent"
android:orientation="vertical"
>

<com.jasoncool.study.view.TimeLineView
android:id="@+id/timeline1"
android:layout_width="match_parent"
android:layout_height="wrap_content"
android:layout_margin="20dp"
app:textSize="20sp"
app:tlradius="7dp"
app:CompleteColor="@color/colorAccent"
app:NoCompleteColor="@color/colorPrimaryDark"
/>

<com.jasoncool.study.view.TimeLineView
android:id="@+id/timeline2"
android:layout_width="match_parent"
android:layout_height="50dp"
android:layout_margin="20dp"
app:textSize="12sp"
app:tlradius="5dp"
/>

</LinearLayout>

第四步:如何使用 也没啥好说的 组件引入了ButterKnife,如果你没用,自己修改一下就可以了。

1
2
3
4
5
6
7
8
9
10
11
12
13
14
15
16
17
18
19
20
21
22
23
24
25
26
27
28
29
30
31
public class TimeLineViewActivity extends AppCompatActivity {

@BindView(R.id.timeline1)
TimeLineView timeline1;
@BindView(R.id.timeline2)
TimeLineView timeline2;

public static void goTimeLineViewActivity(Context context) {
Intent intent = new Intent(context, TimeLineViewActivity.class);
context.startActivity(intent);
}

@Override
protected void onCreate(@Nullable Bundle savedInstanceState) {
super.onCreate(savedInstanceState);
setContentView(R.layout.activity_time_line_layout);
ButterKnife.bind(this);
String[] steps = new String[]{"发起售后","商家收货","商家维修","发回客户"};
timeline1.setPointStrings(steps, 1.535f);
timeline1.setOnTimeLineStepChangeListener(new TimeLineView.OnTimeLineStepClickListener() {
@Override
public void onStepClick(float step) {
Toast.makeText(TimeLineViewActivity.this, "点击的是第" + (int) (step + 1) + "步", Toast.LENGTH_SHORT).show();
timeline1.setStep(step);
}
});
String[] steps2 = new String[]{"第一步哟第一步","第二步","第三部哟第三步","第四步"};
timeline2.setPointStrings(steps2,1.423f);
}

}

结语

代码不难,我用了一上午时间来写出了一个最简陋的DEMO,他可以完成基本需求即可,然后又用了一下午的时间来优化这些代码,完善一些思路和测试一些极端情况,这期间还有一些杂事去处理。

之所以写这个其实是想告诉大家,不要一口吃个胖子,自定义View一定要先根据思路写出基本代码来,然后一步步的优化,当然,如果你很熟悉了另当别论,这也只是我的开发风格而已。

谢谢你看完!

热评文章