在Android开发中,自定义View可以说是从业人员从初级到中级的一个标志性过渡,不论你是老鸟还是新人,不论你是工作还是面试,自定义View都如同一个守关的BOSS一样,无法回避,《心花路放》里张俪( 那个大长腿)说过,“遇到问题,正面面对。”,好吧,躲不起我还打不过么我?撸起袖子,干!
Activity的组成结构粗讲
首先,我们来看一下一个Activity包含哪些组件结构:
可以看到,每一个Activity都包含了PhoneWindow,PhoneWindow又包含了一个DecorView,而DecorView中包含了TitleView和一个ContentView,TitleView就是我们开发过程中需要设置的ActionBar和StatusBar相关,而界面的主体结构都在这个ContentView中设置了,所以我们每次给Activity设置布局文件的必须调用
setContentVIew(int layoutResID)方法来设置。
而ContentView中就包含了一个或多个ViewGroup和View,关于ViewGroup和View,整个ContentView的视图结构:最顶层是ViewGroup,ViewGroup下可能有多个ViewGroup和View,就好像布局文件来说,我们写布局文件的时候,最外层一般都是一个ViewGroup(LinearLayout或者是RelativeLayout等),之后这个ViewGroup内部可能还是一个ViewGroup(LinearLayout或者是RelativeLayout等)或者直接放置了一个或者多个View(如TextView或者是Button等)。
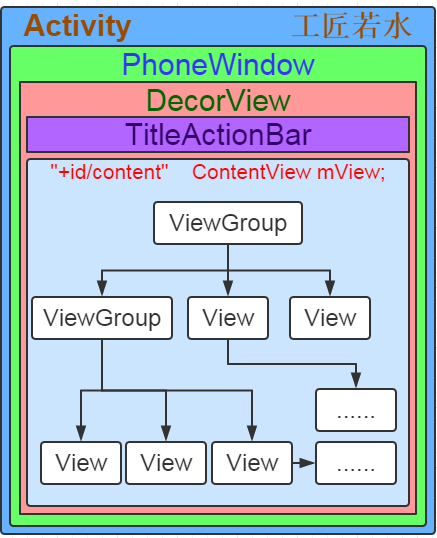
这里需要说明一下,这里所说的ViewGroup包含很多View是说的View的视图结构,而从View的架构来说,所有的ViewGroup其本质还是View的子类,这里要面试的朋友一定要注意了,如果问到你View的架构,千万不要和View的视图结构弄混,否则你来一句View继承自ViewGroup那你这次面试基本上就会以失败告终了。
这里就不细讲整个布局是如何诞生的了,关键是大家要对Activity有一个全局的认识,从而知道我们自定义View在Activity中的具体定位。
自定义View的工作流程
自定义View的工作流程主要指的是Mesusre,Layout和Draw,Measure用来测量View的宽高,Layout用来确定View的位置,Draw则用来绘制View。
虽然话是这么说,但是就好像一个类要运行一定要有一个Main方法一样,一个View的绘制也一定要有一个开始调用的地方才是,那么这个开始调用的方法就是ViewRootImpl类的performTraversales()方法,在这个方法中,这个方法会通过判断来分析这个View是否要执行相关的绘制流程。
单一View的测量过程简述
View的Measure过程根据View的类型分为两种情况,一种是单一View的测量过程,还有一种是ViewGroup的测量过程,这两种测量过程是不同的。
首先先看单一View的测量过程: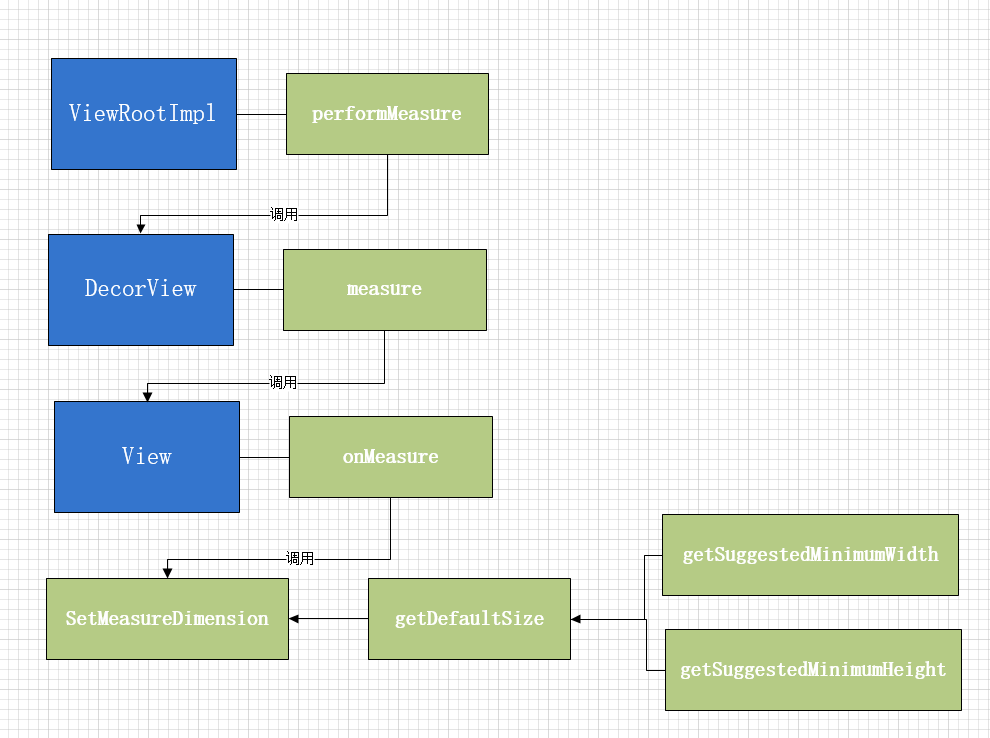
整个的测量过程基本如上图所示,用文字描述一遍就是:
ViewRootImpl调用performMeasure方法后该方法中的DecorView又调用了measure方法,而DecorView的本质其实是集成自FrameLayout,那么本质就是一个ViewGroup,但是在FrameLayout和ViewGroup的源码中都没发现measure方法, 这就用到刚才的知识点了,ViewGroup本身也是View的子类,我们就去View的源码中查看一下,果然,measure方法赫然其中,在measure方法中,View又调用了其自身的方法onMeasure,而起自身的onMeasure方法中又调用setMeasureDimension方法,该方法有两个参数,这两个参数分别代表要设置的宽和高,而这两个参数都是是通过getDefaultSize方法来计算的,而getDefaultSize方法中有一个参数是根据getSuggestedMinimumWidth或getSuggestedMinimumHeight获得的。
之所以没贴源码就直接先说测量过程,是希望大家可以先了解一下View的加载过程,不管是在工作中遇到了问题,或者是面试的时候被人提问,根据这个过程你可以自己分析问题的切入点或者是给面试官描述一下大体的流程,告诉他你已经对View的测量过程有了一个大体的认知了,最起码不会让人家觉得你完全没了解这里的知识。
ViewGroup的测量过程简述
先看ViewGroup的测量过程: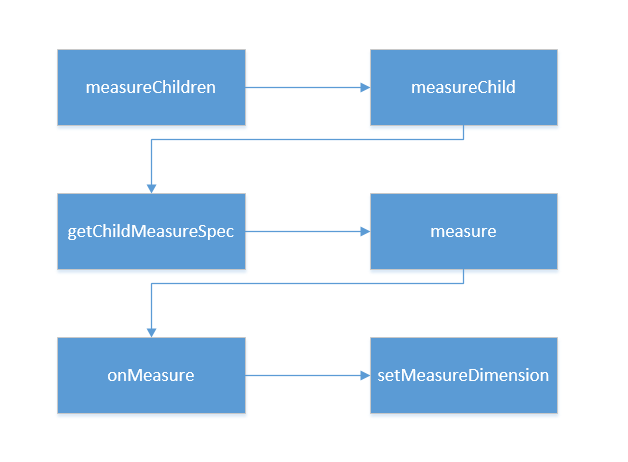
整个测量过程基本如上图所示,其原理就是:
通过遍历所有的子View进行子View的测量,然后将所有子View的尺寸进行合并,最终得到ViewGroup父视图的测量值。
测量中的超级尺子——MeasureSpec
在看整个view的加载过程的源码前,我们先来了解一下View中的一个静态内部类MeasureSpec,有人叫它测量规格,我更喜欢把它描述成为测量过程中必不可少的工具——尺子。
这个尺子有两种用法,横着用就叫做widthMeasureSpec,用来测量宽度,竖着用就叫做heightMeasureSpec,用来测量高度的,不管你的自定义View是什么千奇百怪的形状,他都是要放在一个矩形中进行包裹展示的,那么为什么会有这两个测量方式也就不难理解了。
这个尺子有两个重要的功能,第一个功能自然是测量值了(Size),第二个功能是测量的模式(Mode),这两个参数通过二进制将其打包成一个int(32位)值来减少对内存的分配,其高2位(31,32位)存放的是测量模式,而低30位则存储的是其测量值。
测量模式(specMode)
测量模式分为三种:
- UNSPECIFIED模式:本质就是不限制模式,父视图不对子View进行任何约束,View想要多大要多大,想要多长要多长,这个在我们写自定义View中的时候非常少见,一般都是系统内部在设置ListView或者是ScrollView的时候才会用到。
- EXACTLY模式:该模式其实对应的场景就是match_parent或者是一个具体的数据(50dp或80px),父视图为子View指定一个确切的大小,无论子View的值设置多大,都不能超出父视图的范围。
- AT_MOST模式:这个模式对应的场景就是wrap_content,其内容就是父视图给子View设置一个最大尺寸,子View只要不超过这个尺寸即可。
看完这三个模式,大家可能会有一个疑问,AT_MOST模式不是和EXACTLY模式一样了吗,都是给个最大值来限制View的范围?其实不一样,EXACTLY模式是一个固定的模式,也就是说它是没得商量的,你只能按照这个模式既有的规律来执行而AT_MOST模式是可以根据开发者自己的需求来定制的,我们写自定义View的时候所写的测量其实也就是在写这个模式的测量逻辑,他是根据子控件来灵活的测量尺寸的。
可能你还是懵逼,那请你跟我一起打开IDE,做这么一个简单的测试:
请先写一个TestView,继承View: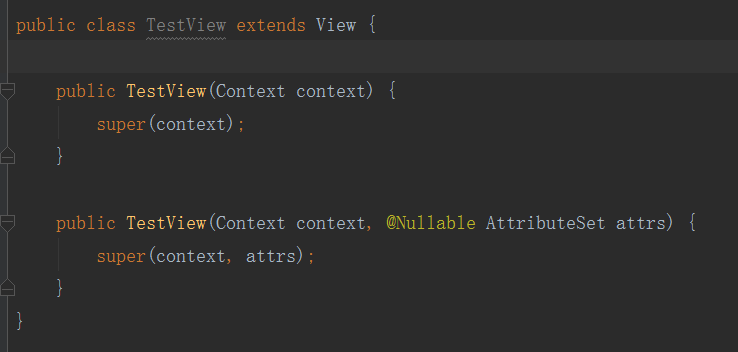
不用重写任何父类的方法,只要随便弄两个构造方法即可。
然后在布局文件中写入如下代码:
这代码太简单了,你想象中的运行效果肯定是这个样子的: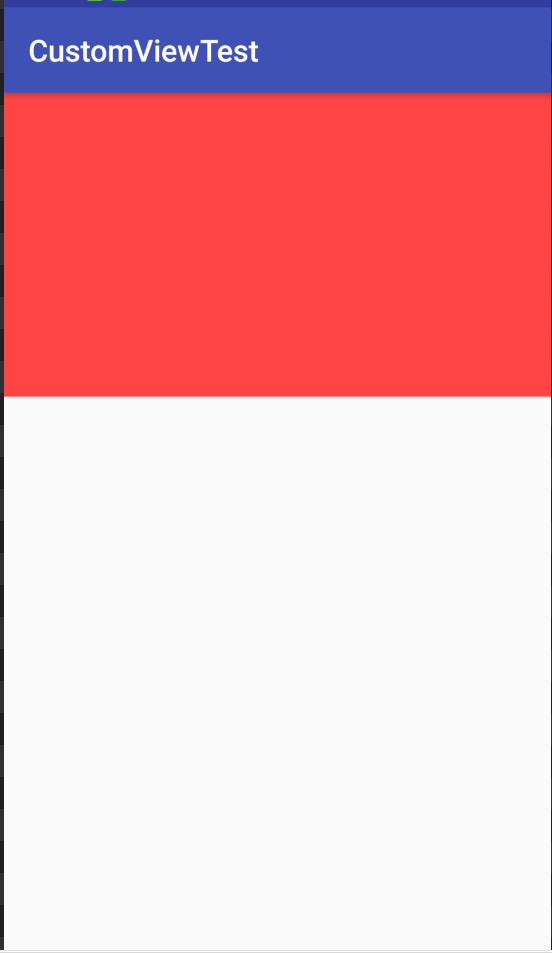
没错,实际效果和你想的一样,但是如果我们将match_parent改成wrap_content会怎样呢?
好了不用想了,我们来看实际效果:
效果没有变化!是的,通过这个测试我们知道一个原理,如果不重写onMeasure的AT_MOST模式的测量逻辑,那么match_parent和wrap_content的效果是一样的。
请带着这个疑问继续看下去。
MeasureSpec确定值
子View的MeasureSpec值是根据子View的布局参数(LayoutParams)和父容器的MeasureSpec至计算而来的,其具体逻辑封装在了getChildMeasureSpec()方法中,现在来分析一下这个方法:1
2
3
4
5
6
7
8
9
10
11
12
13
14
15
16
17
18
19
20
21
22
23
24
25
26
27
28
29
30
31
32
33
34
35
36
37
38
39
40
41
42
43
44
45
46
47
48
49
50
51
52
53
54
55
56
57
58
59
60
61
62
63
64
65
66
67
68
69
70
71
72
73
74
75
76
77
78
79
80
81
82
83
84
85
86
87
88
89
90
91
92
93
94
95
96//从上面我们知道spec 是parent的MeasureSpec,padding是
//已被使用的大小,childDimension为child的大小
public static int getChildMeasureSpec(
int spec, int padding, int childDimension) {
//1、获取parent的specMode
int specMode = MeasureSpec.getMode(spec);
//2、获取parent的specSize
int specSize = MeasureSpec.getSize(spec);
//3、size=剩余的可用大小
int size = Math.max(0, specSize - padding);
int resultSize = 0;
int resultMode = 0;
//4、通过switch语句判断parent的集中mode,分别处理
switch (specMode) {
// 5、parent为MeasureSpec.EXACTLY时
case MeasureSpec.EXACTLY:
if (childDimension >= 0) {
//5.1、当childDimension大于0时,表示child的大小是
//明确指出的,如layout_width= "100dp";
// 此时child的大小= childDimension,
resultSize = childDimension;
//child的测量模式= MeasureSpec.EXACTLY
resultMode = MeasureSpec.EXACTLY;
} else if (childDimension == LayoutParams.MATCH_PARENT) {
//5.2、此时为LayoutParams.MATCH_PARENT
//也就是 android:layout_width="match_parent"
//因为parent的大小是明确的,child要匹配parent的大小
//那么我们就直接让child=parent的大小就好
resultSize = size;
//同样,child的测量模式= MeasureSpec.EXACTLY
resultMode = MeasureSpec.EXACTLY;
} else if (childDimension == LayoutParams.WRAP_CONTENT) {
//5.3、此时为LayoutParams.WRAP_CONTENT
//也就是 android:layout_width="wrap_content"
// 这个模式需要特别对待,child说我要的大小刚好够放
//需要展示的内容就好,而此时我们并不知道child的内容
//需要多大的地方,暂时先把parent的size给他
resultSize = size;
//自然,child的mode就是MeasureSpec.AT_MOST的了
resultMode = MeasureSpec.AT_MOST;
}
break;
// 5、parent为AT_MOST,此时child最大不能超过parent
case MeasureSpec.AT_MOST:
if (childDimension >= 0) {
//同样child大小明确时,
//大小直接时指定的childDimension
resultSize = childDimension;
resultMode = MeasureSpec.EXACTLY;
} else if (childDimension == LayoutParams.MATCH_PARENT) {
// child要跟parent一样大,resultSize=可用大小
resultSize = size;
//因为parent是AT_MOST,child的大小也还是未定的,
//所以也是MeasureSpec.AT_MOST
resultMode = MeasureSpec.AT_MOST;
} else if (childDimension == LayoutParams.WRAP_CONTENT) {
//又是特殊情况,先给child可用的大小
resultSize = size;
resultMode = MeasureSpec.AT_MOST;
}
break;
// 这种模式是很少用的,我们也看下吧
case MeasureSpec.UNSPECIFIED:
if (childDimension >= 0) {
// 与前面同样的处理
resultSize = childDimension;
resultMode = MeasureSpec.EXACTLY;
} else if (childDimension == LayoutParams.MATCH_PARENT) {
// Child wants to be our size... find out how big it should
// be
resultSize = View.sUseZeroUnspecifiedMeasureSpec ? 0 : size;
resultMode = MeasureSpec.UNSPECIFIED;
} else if (childDimension == LayoutParams.WRAP_CONTENT) {
// Child wants to determine its own size.... find out how
// big it should be
resultSize = View.sUseZeroUnspecifiedMeasureSpec ? 0 : size;
resultMode = MeasureSpec.UNSPECIFIED;
}
break;
}
//通过传入resultSize和resultMode生成一个MeasureSpec.返回
return MeasureSpec.makeMeasureSpec(resultSize, resultMode);
}
代码挺长的 总结一下:
- 当子View采用具体数值(dp / px)时
无论父容器的测量模式是什么,子View的测量模式都是EXACTLY且大小等于设置的具体数值; - 当子View采用match_parent时
- 子View的测量模式与父容器的测量模式一致
- 若测量模式为EXACTLY,则子View的大小为父容器的剩余空间;若测量模式为AT_MOST,则子View的大小不超过父容器的剩余空间
- 当子View采用wrap_parent时
无论父容器的测量模式是什么,子View的测量模式都是AT_MOST且大小不超过父容器的剩余空间。
单一View的测量过程详解
还是回顾一下刚才这张图,我们一个步骤一个步骤的来看:
performMeasure()
这个图其实不是那么严谨,因为在加载好系统布局资源后,会触发ViewRootImpl的performTraversals()方法,该方法内容会开始执行测量、布局和绘制的工作,我们来看这个方法的源码关键部分:1
2
3
4
5
6
7
8
9
10
11
12
13
14
15
16
17
18
19
20
21
22
23
24
25private void performTraversals() {
...
if (!mStopped) {
//1、获取顶层布局的childWidthMeasureSpec
int childWidthMeasureSpec = getRootMeasureSpec(mWidth, lp.width);
//2、获取顶层布局的childHeightMeasureSpec
int childHeightMeasureSpec = getRootMeasureSpec(mHeight, lp.height);
//3、测量开始测量
performMeasure(childWidthMeasureSpec, childHeightMeasureSpec);
}
}
if (didLayout) {
//4、执行布局方法
performLayout(lp, desiredWindowWidth, desiredWindowHeight);
...
}
if (!cancelDraw && !newSurface) {
...
//5、开始绘制了哦
performDraw();
}
}
...
}
可以看到,整个方法内部其实就是做了一些基础的判断后,再顺序的调用测量、布局和绘制的相关方法,从而完成自定义View的整个工作流程。
现在看performTraversals方法的第一个注释和第二个注释处,使用的是getRootMeasureSpec方法来获取子View的MeasureSpec,根据一开始我们了解的知识,整个Activity的顶层View其实就是一个DecorView,所以这里获取的其实是DeorView的MeasureSpec,然后将其传入performMeasure方法中去开始测量,现在看看PerformMeasure方法:1
2
3
4
5
6
7
8
9
10private void performMeasure(int childWidthMeasureSpec,
int childHeightMeasureSpec) {
Trace.traceBegin(Trace.TRACE_TAG_VIEW, "measure");
try {
//1、mView其实就是我们的顶层DecorView,从DecorView开始测量
mView.measure(childWidthMeasureSpec, childHeightMeasureSpec);
} finally {
Trace.traceEnd(Trace.TRACE_TAG_VIEW);
}
}
measure()
根据刚才描述的单一View的加载过程,我们在View的源码中找到了measure方法:1
2
3
4
5
6
7public final void measure(int widthMeasureSpec,
int heightMeasureSpec) {
...
onMeasure(widthMeasureSpec, heightMeasureSpec);
...
}
这里有一个细节要注意以下
首先,ViewGroup中并没有重写View的onMeasure方法,但是我们的四大布局FrameLayout LinearLayout RelativeLayout AbsoluteLayout都是通过继承ViewGroup来实现的,而且里面也重写onMeasure方法,所以onMeasure方法是分为两个方向的,单一View的测量是View.onMeasure而ViewGroup的测量则是XXLayout.onMeasure,这两种onMeasure方法的实现是不同的。
View.onMeasure()
其实这个方法的关键作用有三个:
第一,获取一个建议最小值。
第二,调用getDefaultSize方法定义对View尺寸的测量逻辑。
第三,调用setMeasureDimension()储存测量后的View宽/高。
源码如下:1
2
3
4
5
6
7
8protected void onMeasure(int widthMeasureSpec,
int heightMeasureSpec) {
setMeasuredDimension(
getDefaultSize(getSuggestedMinimumWidth(),
widthMeasureSpec),
getDefaultSize(getSuggestedMinimumHeight(),
heightMeasureSpec));
}
这里我们逆向思维,从最内层开始说起:
getSuggestedMinimumWidth() / getSuggestedMinimumHeight()
源码:1
2
3protected int getSuggestedMinimumWidth() {
return (mBackground == null) ? mMinWidth : max(mMinWidth, mBackground.getMinimumWidth());
}
代码很简单,是一个三目运算,意思就是当前View是否有背景?没有就返回android:minWidth设置的值:有就返回android:minWidth和mBackground.getMinimumWidth()中较大的那个值。
那么,mBackground.getMinimumWidth()方法有是什么呢?1
2
3
4
5public int getMinimumWidth() {
final int intrinsicWidth = getIntrinsicWidth();
//返回背景图Drawable的原始宽度
return intrinsicWidth > 0 ? intrinsicWidth :0 ;
}
该处逻辑一样是三目运算,getIntrinsicWidth()获取的是背景图的原始宽度,背景图是BitmapDrawable则有原始宽度,在没有原始宽度的情况下则返回0。
getDefaultSize()
这个方法其实是一个静态工具方法:1
2
3
4
5
6
7
8
9
10
11
12
13
14
15
16
17
18
19
20public static int getDefaultSize(int size, int measureSpec) {
int result = size;
//1、获得MeasureSpec的mode
int specMode = MeasureSpec.getMode(measureSpec);
//2、获得MeasureSpec的specSize
int specSize = MeasureSpec.getSize(measureSpec);
switch (specMode) {
case MeasureSpec.UNSPECIFIED:
//这个我们先不看他
result = size;
break;
case MeasureSpec.AT_MOST:
case MeasureSpec.EXACTLY:
//3、可以看到,最终返回的size就是我们MeasureSpec中测量得到的size
result = specSize;
break;
}
return result;
}
大家应该注意到了,不论测量模式是AT_MOST还是EXACTLY,最终返回的Size是一样的,现在我们再回想之前的问题,为什么我们设置wrap_content时match_parent效果一样呢?
原因其实就在上面的代码中,因为我们并没有重写子View采用wrap_content时的测量方法,所以自定义View不论父视图的布局模式是EXACTLY(非固定值模式)还是AT_MOST也不论子视图的布局模式是match_parent还是wrap_content(只要不是具体的值),系统都会将子View的大小(宽或高)都临时或永久设置成Size(剩余的可用大小),所以在这种情况下,这两种模式所形成的效果就会一样了。
所以在实际开发中,我们必须要处理wrap_content这个情况,否则wrap_content和match_parent的效果就是一样的了。
setMeasureDimension
该方法是储存测量后的View的宽和高的,在自定义View的时候,我们自己重写的onMeasure方法最后一定要调用这个方法,否则会报错。1
2
3
4
5
6
7
8
9
10
11
12
13
14
15
16protected final void setMeasuredDimension(int measuredWidth, int measuredHeight) {
//1、判断是否使用视觉边界布局
boolean optical = isLayoutModeOptical(this);
//2、判断view和parentView使用的视觉边界布局是否一致
if (optical != isLayoutModeOptical(mParent)) {
//不一致时要做一些边界的处理
Insets insets = getOpticalInsets();
int opticalWidth = insets.left + insets.right;
int opticalHeight = insets.top + insets.bottom;
measuredWidth += optical ? opticalWidth : -opticalWidth;
measuredHeight += optical ? opticalHeight : -opticalHeight;
}
//3、重点来了,经过过滤之后调用了setMeasuredDimensionRaw方法,看来应该是这个方法设置我们的view的大小
setMeasuredDimensionRaw(measuredWidth, measuredHeight);
}
继续看setMeasureDimensionRaw方法:1
2
3
4
5
6
7
8private void setMeasuredDimensionRaw(int measuredWidth, int measuredHeight) {
//最终将测量好的大小存储到mMeasuredWidth和mMeasuredHeight上,所以在测量之后
//我们可以通过调用getMeasuredWidth获得测量的宽、getMeasuredHeight获得高
mMeasuredWidth = measuredWidth;
mMeasuredHeight = measuredHeight;
mPrivateFlags |= PFLAG_MEASURED_DIMENSION_SET;
}
以上就是一个单一View的测量过程了,其顺序为:
performTraversals->performMeasure->measure->onMeasure-> setMeasuredDimension-> setMeasuredDimensionRaw,由setMeasuredDimensionRaw最终保存测量的数据。
ViewGroup的测量过程详解
根据上图,我们还是一个步骤一个步骤的进行分析:
measureChildren()
其作用就是遍历子View并调用measureChild()进行下一步测量1
2
3
4
5
6
7
8
9
10
11
12
13
14
15protected void measureChildren(int widthMeasureSpec, int heightMeasureSpec) {
//参数说明:父视图的测量规格(MeasureSpec)
final int size = mChildrenCount;
final View[] children = mChildren;
//遍历所有的子view
for (int i = 0; i < size; ++i) {
final View child = children[i];
//如果View的状态不是GONE就调用measureChild()去进行下一步的测量
if ((child.mViewFlags & VISIBILITY_MASK) != GONE) {
measureChild(child, widthMeasureSpec, heightMeasureSpec);
}
}
}
measureChild()
其作用就是计算单个子View的MeasureSpec,调用子View的measure进行每个子View最后的宽、高的测量
1 | protected void measureChild(View child, int parentWidthMeasureSpec, |
measure()
与单一View的measure一致
1 | public final void measure(int widthMeasureSpec, int heightMeasureSpec) { |
XXXLayout.onMeasure()
仔细看过文章前面的朋友应该记得我在4.2 measure() 中提到过,ViewGroup的onMeasure和View的onMeasure是不同的,究其原因其实是因为ViewGroup是一个抽象类,所以即便它继承了View也不用必须实现View中的onMeasure方法,而它的子类不具备通用的布局特性,这导致他们的子View的测量方法各不相同,因此,ViewGroup无法对onMeasure()做统一的实现。
这里以FrameLayout为例,看看它的onMeasure是如何实现的:1
2
3
4
5
6
7
8
9
10
11
12
13
14
15
16
17
18
19
20
21
22
23
24
25
26
27
28
29
30
31
32
33
34
35
36
37
38
39
40
41
42
43
44
45
46
47
48
49
50
51
52
53
54
55
56
57
58
59
60
61
62
63
64
65
66
67
68
69
70
71
72
73
74
75
76
77
78
79
80
81
82
83
84
85
86
87
88
89
90
91
92
93
94
95
96
97
98
99
100
101//这里的widthMeasureSpec、heightMeasureSpec
//其实就是我们frameLayout可用的widthMeasureSpec 、
//heightMeasureSpec
protected void onMeasure(int widthMeasureSpec, int heightMeasureSpec) {
//1、获得frameLayout下childView的个数
int count = getChildCount();
//2、看这里的代码我们可以根据前面的Measure图来进行分析,因为只要parent
//不是EXACTLY模式,以frameLayout为例,假设frameLayout本身还不是EXACTL模式,
// 那么表示他的大小此时还是不确定的,从表得知,此时frameLayout的大小是根据
//childView的最大值来设置的,这样就很好理解了,也就是childView测量好后还要再
//测量一次,因为此时frameLayout的值已经可以算出来了,对于child为MATCH_PARENT
//的,child的大小也就确定了,理解了这里,后面的代码就很 容易看懂了
final boolean measureMatchParentChildren =
MeasureSpec.getMode(widthMeasureSpec) != MeasureSpec.EXACTLY ||
MeasureSpec.getMode(heightMeasureSpec) != MeasureSpec.EXACTLY;
//3、清理存储模式为MATCH_PARENT的child的队列
mMatchParentChildren.clear();
//4、下面三个值最终会用来设置frameLayout的大小
int maxHeight = 0;
int maxWidth = 0;
int childState = 0;
//5、开始便利frameLayout下的所有child
for (int i = 0; i < count; i++) {
final View child = getChildAt(i);
//6、小发现哦,只要mMeasureAllChildren是true,就算child是GONE也会被测量哦,
if (mMeasureAllChildren || child.getVisibility() != GONE) {
//7、开始测量childView
measureChildWithMargins(child, widthMeasureSpec, 0, heightMeasureSpec, 0);
//8、下面代码是获取child中的width 和height的最大值,后面用来重新设置frameLayout,有需要的话
final LayoutParams lp = (LayoutParams) child.getLayoutParams();
maxWidth = Math.max(maxWidth,
child.getMeasuredWidth() + lp.leftMargin + lp.rightMargin);
maxHeight = Math.max(maxHeight,
child.getMeasuredHeight() + lp.topMargin + lp.bottomMargin);
childState = combineMeasuredStates(childState, child.getMeasuredState());
//9、如果frameLayout不是EXACTLY,
if (measureMatchParentChildren) {
if (lp.width == LayoutParams.MATCH_PARENT ||
lp.height == LayoutParams.MATCH_PARENT) {
//10、存储LayoutParams.MATCH_PARENT的child,因为现在还不知道frameLayout大小,
//也就无法设置child的大小,后面需重新测量
mMatchParentChildren.add(child);
}
}
}
}
....
//11、这里开始设置frameLayout的大小
setMeasuredDimension(resolveSizeAndState(maxWidth, widthMeasureSpec, childState),
resolveSizeAndState(maxHeight, heightMeasureSpec,
childState << MEASURED_HEIGHT_STATE_SHIFT));
//12、frameLayout大小确认了,我们就需要对宽或高为LayoutParams.MATCH_PARENTchild重新测量,设置大小
count = mMatchParentChildren.size();
if (count > 1) {
for (int i = 0; i < count; i++) {
final View child = mMatchParentChildren.get(i);
final MarginLayoutParams lp = (MarginLayoutParams) child.getLayoutParams();
final int childWidthMeasureSpec;
if (lp.width == LayoutParams.MATCH_PARENT) {
final int width = Math.max(0, getMeasuredWidth()
- getPaddingLeftWithForeground() - getPaddingRightWithForeground()
- lp.leftMargin - lp.rightMargin);
//13、注意这里,为child是EXACTLY类型的childWidthMeasureSpec,
//也就是大小已经测量出来了不需要再测量了
//通过MeasureSpec.makeMeasureSpec生成相应的MeasureSpec
childWidthMeasureSpec = MeasureSpec.makeMeasureSpec(
width, MeasureSpec.EXACTLY);
} else {
//14、如果不是,说明此时的child的MeasureSpec是EXACTLY的,直接获取child的MeasureSpec,
childWidthMeasureSpec = getChildMeasureSpec(widthMeasureSpec,
getPaddingLeftWithForeground() + getPaddingRightWithForeground() +
lp.leftMargin + lp.rightMargin,
lp.width);
}
// 这里是对高做处理,与宽类似
final int childHeightMeasureSpec;
if (lp.height == LayoutParams.MATCH_PARENT) {
final int height = Math.max(0, getMeasuredHeight()
- getPaddingTopWithForeground() - getPaddingBottomWithForeground()
- lp.topMargin - lp.bottomMargin);
childHeightMeasureSpec = MeasureSpec.makeMeasureSpec(
height, MeasureSpec.EXACTLY);
} else {
childHeightMeasureSpec = getChildMeasureSpec(heightMeasureSpec,
getPaddingTopWithForeground() + getPaddingBottomWithForeground() +
lp.topMargin + lp.bottomMargin,
lp.height);
}
//最终,再次测量child
child.measure(childWidthMeasureSpec, childHeightMeasureSpec);
}
}
}
总结
通过本文的讲解,不知道你对自定义View和ViewGroup的测量过程有没有一个清楚的认识呢?其实我们在学习的过程中,不必要完全了解源码中的每个细节,而是应当了解源码的逻辑顺序并将其大致过程记录下来,这样不论是在工作还是面试的过程中,我们根据大致的逻辑流程来分析问题,从而达到学以致用的目的。
最后我付一个Android自定义View的面试题答案,我认为讲的还是比较不错的,希望大家看完后再结合之前文章中提到的内容进行记忆整理。
- ViewRootImpl 会调用 performTraversals(), 其内部会调用performMeasure()、performLayout、performDraw()。
- performMeasure() 会调用最外层的 ViewGroup的measure()–>onMeasure(), ViewGroup 的 onMeasure() 是抽象方法,但其提供了measureChildren(),这之中会遍历子View然后循环调用measureChild() 这之中会用 getChildMeasureSpec()+父View的MeasureSpec+子View的LayoutParam一起获取本View的MeasureSpec,然后调用子View的measure()到View的onMeasure()–>setMeasureDimension(getDefaultSize(),getDefaultSize()),getDefaultSize()默认返回measureSpec的测量数值,所以继承View进行自定义的wrap_content需要重写。
3 .performLayout()会调用最外层的ViewGroup的layout(l,t,r,b),本View在其中使用setFrame()设置本View的四个顶点位置。在onLayout(抽象方法)中确定子View的位置,如LinearLayout会遍历子View,循环调用setChildFrame()–>子View.layout()。- performDraw() 会调用最外层 ViewGroup的draw():其中会先后调用background.draw()(绘制背景)、onDraw()(绘制自己)、dispatchDraw()(绘制子View)、onDrawScrollBars()(绘制装饰)。
- MeasureSpec由2位SpecMode(UNSPECIFIED、EXACTLY(对应精确值和match_parent)、AT_MOST(对应warp_content))和30位SpecSize组成一个int,DecorView的MeasureSpec由窗口大小和其LayoutParams决定,其他View由父View的MeasureSpec和本View的LayoutParams决定。ViewGroup中有getChildMeasureSpec()来获取子View的MeasureSpec。
- 三种方式获取measure()后的宽高:
1.Activity#onWindowFocusChange()中调用获取
2.view.post(Runnable)将获取的代码投递到消息队列的尾部。
3.ViewTreeObservable.