为什么用SpringSecurity?
之前搭建好Nexus私服之后,就想着开始封装一套固定的权限管理模块,以备公司项目使用,之前我们部门一直使用的是Shiro,但是后来经过再三的考虑,感觉Shiro毕竟不是Spring的亲儿子,小版本升级还好,如果一旦遇到Springboot的大版本升级,则会明显感觉到亲儿子在时效性上的优势(之前我们试图在Springboot2.0上使用Activiti6,噩梦啊!)
好了,闲言少叙,现在开始在Springboot2.0中加入SpringSecurity吧!
为什么我还要写这个文章?
确实,市面上的SpringSecurity的教程数不胜数,入门教程和集成教程一大堆,为什么我还要再写一篇这样的教程呢?
其实网上有很多教程,虽然教会了你如何集成SpringScurity并且基于这个框架做简单的权限管理,但是他们都是有一个很大的弊端就是在生产环境中,每次请求都要去数据库查询该用户的角色信息,这在小系统或者是权限不敏感的系统中还行,但是如果是一个权限敏感的大系统,每次请求都要去数据库查角色和权限的话,对这个系统来说简直就是噩梦,所以要做一个登录一次就能获取相关角色和权限,在这次请求中都基于缓存中的角色和权限来访问即可,这样就可以大大减少访问数据库访问次数,提高用户响应速度。
SpringSecurity基础教程
这个基础教程可以参考:
SpringBoot集成Spring Security(1)——入门程序
SpringBoot集成Spring Security(2)——自动登录
SpringBoot集成Spring Security(3)——异常处理
SpringBoot集成Spring Security(4)——自定义表单登录
SpringBoot集成Spring Security(5)——权限控制
这个SpringSecurity教程是我看过的入门教程里非常不错的文章了,建议在学习本篇文章前先去学习该系列教程。
更高的追求
通过学习之前的入门教程,我们基本上上可以使用SpringSecurity的基础功能了,但是我们也会发现,每次点击请求的时候都会执行查询角色和权限的Sql语句,现在我们需要解决这个问题。
按照这个项目的代码,我们先修改一下权限表的数据展示方式,使它更符合真实项目结构:1
2
3
4
5
6
7
8
9
10
11
12
13
14
15
16
17
18
19
20
21
22
23
24
25
26
27
28
29
30
31
32
33
34
35
36
37
38
39
40/*
Navicat MySQL Data Transfer
Source Server : 本地数据库
Source Server Version : 50624
Source Host : localhost:3306
Source Database : test
Target Server Type : MYSQL
Target Server Version : 50624
File Encoding : 65001
Date: 2018-05-28 16:58:48
*/
SET FOREIGN_KEY_CHECKS=0;
-- ----------------------------
-- Table structure for sys_permission
-- ----------------------------
DROP TABLE IF EXISTS `sys_permission`;
CREATE TABLE `sys_permission` (
`id` int(11) NOT NULL AUTO_INCREMENT,
`url` varchar(255) DEFAULT NULL,
`role_id` int(11) DEFAULT NULL,
`permission` varchar(255) DEFAULT NULL,
PRIMARY KEY (`id`),
KEY `fk_roleId` (`role_id`),
CONSTRAINT `fk_roleId` FOREIGN KEY (`role_id`) REFERENCES `sys_role` (`id`) ON DELETE CASCADE ON UPDATE CASCADE
) ENGINE=InnoDB AUTO_INCREMENT=7 DEFAULT CHARSET=utf8;
-- ----------------------------
-- Records of sys_permission
-- ----------------------------
INSERT INTO `sys_permission` VALUES ('1', '/admin/c', '1', 'create');
INSERT INTO `sys_permission` VALUES ('2', '/admin/r', '2', 'read');
INSERT INTO `sys_permission` VALUES ('3', '/admin/r', '1', 'read');
INSERT INTO `sys_permission` VALUES ('4', '/admin/u', '1', 'update');
INSERT INTO `sys_permission` VALUES ('5', '/admin/d', '1', 'delete');
INSERT INTO `sys_permission` VALUES ('6', '/admin/d', '2', 'delete');
通过这个数据结构,我们可以了解到,我们的权限表是通过路径、权限名称和角色ID相关联来控制用户的权限的。
然后就开始我们的自定义之旅了:
首先我们先了解一下SpringSecurity是如何通过权限来管理用户访问的界面的:
1) 系统启动时先加载数据库中设置的所有需要权限才能访问的界面路径和权限,放置在Map中存储备用。
2) 用户登录的时候获取该用户应有的角色信息和权限信息,并存入该用户的个人信息中。
3) 通过你请求的路径获取你的权限信息与系统中的权限信息做对应,看你是否拥有该权限,如果有就可以访问该页面。
4) 如果没有该权限,还要再判断你是否拥有相关的角色信息,如果有相关的角色就可以访问带@PreAuthorize(“hasRole(‘ADMIN’)”)注解的页面了。
5) 如果你访问的界面不在权限管理的范围内则直接放行,可以访问。
这个过程比较绕,但是需要你慢慢消化理解,没有好办法。
帮助理解的流程图: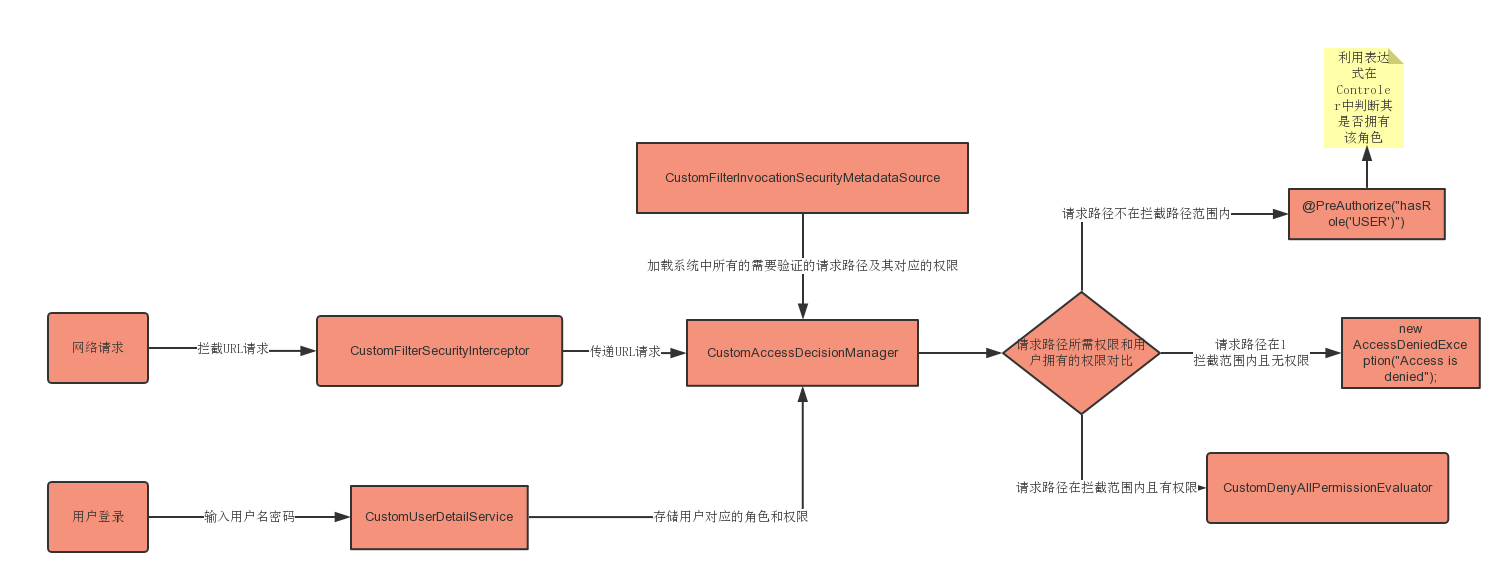
3.1 自定义UserDetailSerivce接口
这个接口之前已经自定义过了,但是要符合权限管理,则需要进行重写修改,具体的内容看代码和注释吧,写的很清楚了:1
2
3
4
5
6
7
8
9
10
11
12
13
14
15
16
17
18
19
20
21
22
23
24
25
26
27
28
29
30
31
32
33
34
35
36
37
38
39
40
41
42
43
44
45
46
47
48
49
50
51
52
53
54
55
56
57
58
59
60
61
62
63
64
65
66
67
68
69
70
71package com.test.security.security;
import com.test.security.entity.SysPermission;
import com.test.security.entity.SysRole;
import com.test.security.entity.SysUser;
import com.test.security.service.SysPermissionService;
import com.test.security.service.SysUserService;
import org.apache.commons.lang3.StringUtils;
import org.slf4j.Logger;
import org.slf4j.LoggerFactory;
import org.springframework.beans.factory.annotation.Autowired;
import org.springframework.security.core.GrantedAuthority;
import org.springframework.security.core.authority.SimpleGrantedAuthority;
import org.springframework.security.core.userdetails.User;
import org.springframework.security.core.userdetails.UserDetails;
import org.springframework.security.core.userdetails.UserDetailsService;
import org.springframework.security.core.userdetails.UsernameNotFoundException;
import org.springframework.stereotype.Component;
import java.util.ArrayList;
import java.util.List;
/**
* @Author:jasoncool
* @Description:
* @Date:创建于上午 09:15 2018/5/23
* @Modified:
*/
@Component
public class CustomUserDetailService implements UserDetailsService {
private Logger log = LoggerFactory.getLogger(CustomUserDetailService.class);
@Autowired
private SysUserService userService;
@Autowired
private SysPermissionService permissionService;
@Override
public UserDetails loadUserByUsername(String username) throws UsernameNotFoundException {
if (username == null || "".equals(username.trim())) {
throw new UsernameNotFoundException("用户名为空");
}
// 从数据库中取出用户信息
SysUser user = userService.selectByName(username);
// 判断用户是否存在
if (user == null) {
throw new UsernameNotFoundException("用户名不存在");
}
List<SysPermission> permissions = permissionService.listByUserId(user.getId());
List<GrantedAuthority> grantedAuthorities = new ArrayList<>();
List<SysRole> roles = userService.findRolesById(user.getId());
for (SysRole role : roles) {
if (StringUtils.isNotBlank(role.getName())) {
GrantedAuthority grantedAuthority = new SimpleGrantedAuthority(role.getName());
//此处将角色信息添加到 GrantedAuthority 对象中,在后面进行全权限验证时会使用GrantedAuthority 对象。
grantedAuthorities.add(grantedAuthority);
}
}
for (SysPermission permission : permissions) {
if (permission != null && permission.getPermission() != null) {
GrantedAuthority grantedAuthority = new SimpleGrantedAuthority(permission.getPermission());
//此处将权限信息添加到 GrantedAuthority 对象中,在后面进行全权限验证时会使用GrantedAuthority 对象。
grantedAuthorities.add(grantedAuthority);
}
}
// 返回UserDetails实现类
return new User(user.getName(), user.getPassword(), grantedAuthorities);
}
}
之后是权限拦截过滤器CustomFilterSecurityInterceptor:1
2
3
4
5
6
7
8
9
10
11
12
13
14
15
16
17
18
19
20
21
22
23
24
25
26
27
28
29
30
31
32
33
34
35
36
37
38
39
40
41
42
43
44
45
46
47
48
49
50
51
52
53
54
55
56
57
58
59
60
61
62
63
64
65
66
67
68
69
70
71
72
73
74
75
76
77
78
79
80
81
82
83
84package com.test.security.security.permission;
/**
* @Author:jasoncool
* @Description: 该过滤器的主要作用就是通过spring著名的IoC生成securityMetadataSource。
* securityMetadataSource相当于本包中自定义的MyInvocationSecurityMetadataSourceService。
* 该MyInvocationSecurityMetadataSourceService的作用提从数据库提取权限和资源,装配到HashMap中,
* 供Spring Security使用,用于权限校验。
* @Date:创建于上午 11:44 2018/5/24
* @Modified:
*/
import javax.servlet.Filter;
import javax.servlet.FilterChain;
import javax.servlet.FilterConfig;
import javax.servlet.ServletException;
import javax.servlet.ServletRequest;
import javax.servlet.ServletResponse;
import org.springframework.beans.factory.annotation.Autowired;
import org.springframework.security.access.SecurityMetadataSource;
import org.springframework.security.access.intercept.AbstractSecurityInterceptor;
import org.springframework.security.access.intercept.InterceptorStatusToken;
import org.springframework.security.web.FilterInvocation;
import org.springframework.stereotype.Service;
import java.io.IOException;
import org.slf4j.Logger;
import org.slf4j.LoggerFactory;
@Service
public class CustomFilterSecurityInterceptor extends AbstractSecurityInterceptor implements Filter {
private Logger log = LoggerFactory.getLogger(CustomFilterSecurityInterceptor.class);
/**
* 权限配置资源管理器
*/
@Autowired
private CustomFilterInvocationSecurityMetadataSource customFilterInvocationSecurityMetadataSource;
/**权限管理决断器*/
@Autowired
public void setMyAccessDecisionManager(CustomAccessDecisionManager customAccessDecisionManager) {
super.setAccessDecisionManager(customAccessDecisionManager);
}
@Override
public void init(FilterConfig filterConfig) throws ServletException {
}
@Override
public void doFilter(ServletRequest request, ServletResponse response, FilterChain chain) throws IOException, ServletException {
FilterInvocation fi = new FilterInvocation(request, response, chain);
invoke(fi);
}
public void invoke(FilterInvocation fi) throws IOException, ServletException {
//fi里面有一个被拦截的url
//里面调用CustomFilterInvocationSecurityMetadataSource的getAttributes(Object object)这个方法获取fi对应的所有权限
//再调用CustomAccessDecisionManager的decide方法来校验用户的权限是否足够
InterceptorStatusToken token = super.beforeInvocation(fi);
try {
//执行下一个拦截器
fi.getChain().doFilter(fi.getRequest(), fi.getResponse());
}finally {
super.afterInvocation(token, null);
}
}
@Override
public void destroy() {
}
@Override
public Class<?> getSecureObjectClass() {
return FilterInvocation.class;
}
@Override
public SecurityMetadataSource obtainSecurityMetadataSource() {
return this.customFilterInvocationSecurityMetadataSource;
}
}
然后是权限配置资源管理器CustomFilterInvocationSecurityMetadataSource:1
2
3
4
5
6
7
8
9
10
11
12
13
14
15
16
17
18
19
20
21
22
23
24
25
26
27
28
29
30
31
32
33
34
35
36
37
38
39
40
41
42
43
44
45
46
47
48
49
50
51
52
53
54
55
56
57
58
59
60
61
62
63
64
65
66
67
68
69
70
71
72
73
74
75
76
77
78
79
80
81
82
83
84
85
86
87
88
89
90
91
92
93
94
95
96
97
98
99
100
101
102
103
104
105
106
107
108
109
110package com.test.security.security.permission;
import com.test.security.dao.SysPermissionMapper;
import com.test.security.dao.SysRoleMapper;
import com.test.security.entity.SysPermission;
import org.slf4j.Logger;
import org.slf4j.LoggerFactory;
import org.springframework.beans.factory.annotation.Autowired;
import org.springframework.security.access.ConfigAttribute;
import org.springframework.security.access.SecurityConfig;
import org.springframework.security.web.FilterInvocation;
import org.springframework.security.web.access.intercept.FilterInvocationSecurityMetadataSource;
import org.springframework.security.web.util.matcher.AntPathRequestMatcher;
import org.springframework.stereotype.Service;
import javax.annotation.PostConstruct;
import javax.servlet.http.HttpServletRequest;
import java.util.*;
/**
* @author:jasoncool
* @Description:
* 权限配置资源管理器实现了FilterInvocationSecurityMetadataSource,
* 在启动时就去加载了所有的权限列表,权限配置资源管理器为决断器实时提供支持,
* 判断用户访问的资源是否在受保护的范围之内。
* @Date:创建于上午 11:46 2018/5/24
* @Modified:
*/
@Service
public class CustomFilterInvocationSecurityMetadataSource implements FilterInvocationSecurityMetadataSource {
private Logger log = LoggerFactory.getLogger(CustomFilterInvocationSecurityMetadataSource.class);
@Autowired
private SysPermissionMapper sysPermissionDao;
/**
* 系统根据数据库中访问的url为key,权限的列表为值,
* 用来存储系统相关的全部权限
*/
private HashMap<String, Collection<ConfigAttribute>> urlPerMap =null;
/**
* 加载数据库权限表中的所有权限
*/
@PostConstruct
public void loadResourceDefine(){
urlPerMap = new HashMap<>(16);
/**
* 存储的是项目中权限的列表,用集合的方式存储是因为一个url可能会对应多种权限,
* 在数据库的字段中可以通过一个特殊的字符进行分割,这样就可以做到不同权限的用户
* 查看不通的界面效果。
*/
Collection<ConfigAttribute> perList;
//用来存储权限的容器
ConfigAttribute cfg;
//从数据库查询全部的权限信息
List<SysPermission> permissions = sysPermissionDao.findAll();
//循环权限信息并通过数据库的url字段为key,传入不通的权限值,并将其存入到urlPerMap中去。
for(SysPermission permission : permissions) {
perList = new HashSet<>();
log.info("---------------------加载数据库中全部权限----------------------");
cfg = new SecurityConfig(permission.getPermission());
perList.add(cfg);
urlPerMap.put(permission.getUrl(), perList);
}
}
/**
* 此方法是为了判定用户请求的url
* 是否在权限表中,如果在权限表中,
* 则返回给 decide 方法,
* 用来判定用户是否有此权限。
* 如果不在权限表中则放行。
* @param object 请求的url路径
* @return 请求此url路径应有的权限
* @throws IllegalArgumentException
*/
@Override
public Collection<ConfigAttribute> getAttributes(Object object) throws IllegalArgumentException {
//如果存储系统所有权限的map为空,则从执行loadResourceDefine()方法
if(urlPerMap ==null){
loadResourceDefine();
}
//object 中包含用户请求的request 信息
HttpServletRequest request = ((FilterInvocation) object).getHttpRequest();
AntPathRequestMatcher matcher;
String resUrl;
for(Iterator<String> iter = urlPerMap.keySet().iterator(); iter.hasNext(); ) {
resUrl = iter.next();
//ant匹配规则的匹配路径,如果构造方法中至传入路径则需要完全匹配。
matcher = new AntPathRequestMatcher(resUrl);
//请求路径和urlPerMap中的路径进行匹配,成功了就从urlPerMap中获取对应路径的权限
if(matcher.matches(request)) {
return urlPerMap.get(resUrl);
}
}
return null;
}
@Override
public Collection<ConfigAttribute> getAllConfigAttributes() {
return null;
}
@Override
public boolean supports(Class<?> clazz) {
return true;
}
}
权限管理决断器CustomAccessDecisionManager:1
2
3
4
5
6
7
8
9
10
11
12
13
14
15
16
17
18
19
20
21
22
23
24
25
26
27
28
29
30
31
32
33
34
35
36
37
38
39
40
41
42
43
44
45
46
47
48
49
50
51
52
53
54
55
56
57
58
59
60
61
62
63
64
65
66
67
68
69
70
71
72
73
74
75
76
77
78
79
80
81
82
83
84
85
86
87
88
89
90
91package com.test.security.security.permission;
/**
* 权限管理决断器
*
* @Author:jasoncool
* @Description:
* AccessdecisionManager在Spring security中是很重要的。
* 在验证部分简略提过了,所有的Authentication实现需要保存在一个GrantedAuthority对象数组中。
* 这就是赋予给主体的权限。 GrantedAuthority对象通过AuthenticationManager
* 保存到 Authentication对象里,然后从AccessDecisionManager读出来,进行授权判断。
* Spring Security提供了一些拦截器,来控制对安全对象的访问权限,例如方法调用或web请求。
* 一个是否允许执行调用的预调用决定,是由AccessDecisionManager实现的。
* 这个 AccessDecisionManager 被AbstractSecurityInterceptor调用,
* 它用来作最终访问控制的决定。 这个AccessDecisionManager接口包含三个方法:
* void decide(Authentication authentication, Object secureObject,
* List<ConfigAttributeDefinition> config) throws AccessDeniedException;
* boolean supports(ConfigAttribute attribute);
* boolean supports(Class clazz);
* 从第一个方法可以看出来,AccessDecisionManager使用方法参数传递所有信息,这好像在认证评估时进行决定。
* 特别是,在真实的安全方法期望调用的时候,传递安全Object启用那些参数。
* 比如,让我们假设安全对象是一个MethodInvocation。
* 很容易为任何Customer参数查询MethodInvocation,
* 然后在AccessDecisionManager里实现一些有序的安全逻辑,来确认主体是否允许在那个客户上操作。
* 如果访问被拒绝,实现将抛出一个AccessDeniedException异常。
* 这个 supports(ConfigAttribute) 方法在启动的时候被
* AbstractSecurityInterceptor调用,来决定AccessDecisionManager
* 是否可以执行传递ConfigAttribute。
* supports(Class)方法被安全拦截器实现调用,
* 包含安全拦截器将显示的AccessDecisionManager支持安全对象的类型。
*@Date:创建于上午 11:45 2018/5/24
*@Modified:
*/
import org.slf4j.Logger;
import org.slf4j.LoggerFactory;
import org.springframework.security.access.AccessDecisionManager;
import org.springframework.security.access.AccessDeniedException;
import org.springframework.security.access.ConfigAttribute;
import org.springframework.security.authentication.InsufficientAuthenticationException;
import org.springframework.security.core.Authentication;
import org.springframework.security.core.GrantedAuthority;
import org.springframework.stereotype.Service;
import java.util.Collection;
import java.util.Iterator;
@Service
public class CustomAccessDecisionManager implements AccessDecisionManager {
private Logger log = LoggerFactory.getLogger(CustomAccessDecisionManager.class);
/**
* 判断该用户对于此页面是否有权限访问的决策方法
* @param authentication 是释CustomUserService中循环添加到 GrantedAuthority 对象中的权限信息集合.
* @param object 包含客户端发起的请求的requset信息,可转换为 HttpServletRequest request = ((FilterInvocation) object).getHttpRequest();
* @param configAttributes 为MyInvocationSecurityMetadataSource的getAttributes(Object object)这个方法返回的结果,
* 此方法是为了判定用户请求的url 是否在权限表中,如果在权限表中,则返回给 decide 方法,
* 用来判定用户是否有此权限。如果不在权限表中则放行。
* @throws AccessDeniedException 如果认证对象不具有所需的权限则抛出此异常
* @throws InsufficientAuthenticationException 如果身份验证请求因为凭据信任不足而被拒绝,则会抛出此错误。
*/
@Override
public void decide(Authentication authentication, Object object, Collection<ConfigAttribute> configAttributes) throws AccessDeniedException, InsufficientAuthenticationException {
if (null == configAttributes || configAttributes.size() <= 0) {
return;
}
String needRole;
for (Iterator<ConfigAttribute> iter = configAttributes.iterator(); iter.hasNext(); ) {
ConfigAttribute c = iter.next();
//得到访问这个界面需要的权限
needRole = c.getAttribute();
//authentication 为在CustomUserService中循环添加到 GrantedAuthority 对象中的权限信息集合
for (GrantedAuthority ga : authentication.getAuthorities()) {
if (needRole.trim().equals(ga.getAuthority())) {
return;
}
}
log.info("【权限管理决断器】需要role:" + needRole);
}
throw new AccessDeniedException("Access is denied");
}
@Override
public boolean supports(ConfigAttribute attribute) {
return true;
}
@Override
public boolean supports(Class<?> clazz) {
return true;
}
}
整体拦截器CustomDenyAllPermissionEvaluator:1
2
3
4
5
6
7
8
9
10
11
12
13
14
15
16
17
18
19
20
21
22
23
24
25
26
27
28
29
30
31
32
33
34
35
36
37
38
39package com.test.security.security.permission;
import org.slf4j.Logger;
import org.slf4j.LoggerFactory;
import org.springframework.security.access.expression.DenyAllPermissionEvaluator;
import org.springframework.security.core.Authentication;
import org.springframework.security.core.GrantedAuthority;
import org.springframework.security.core.userdetails.User;
import org.springframework.stereotype.Component;
import java.util.Collection;
/**
* @author:jasoncool
* @Description:
* 一个拒绝所有访问的空PermissionEvaluator,默认情况下用于不需要权限评估的情况。
* 如果Controller中加入了注解@PreAuthorize("hasPermission('GUEST')"),就会调用DenyAllPermissionEvaluator
* 由于DenyAllPermissionEvaluator会默认拦截所有网络请求,但其实这时的网络请求已经是经过权限过滤过的请求了,
* 是可以访问的了,所以要继承DenyAllPermissionEvaluator 并重写haspermission方法,让其返回true即可。
* 如果去掉了@PreAuthorize("hasPermission('GUEST')")注解,访问对应的Controller方法则不会进入本类。
* @Date:创建于上午 11:50 2018/5/25
* @Modified:
*/
@Component
public class CustomDenyAllPermissionEvaluator extends DenyAllPermissionEvaluator {
private Logger logger = LoggerFactory.getLogger(this.getClass());
@Override
public boolean hasPermission(Authentication authentication, Object target, Object permission) {
User user = (User)authentication.getPrincipal();
logger.info("用户名是:"+user.getUsername());
Collection<GrantedAuthority> authorities = user.getAuthorities();
for(GrantedAuthority authority : authorities) {
String roleName = authority.getAuthority();
logger.info(user.getUsername()+"的权限有:"+roleName);
}
logger.info(authentication.getName()+"访问了"+target.toString()+"路径的"+permission.toString()+"权限");
return true;
}
}
还有就是LoginController,分为有角色过滤的请求和普通请求,代码如下:1
2
3
4
5
6
7
8
9
10
11
12
13
14
15
16
17
18
19
20
21
22
23
24
25
26
27
28
29
30
31
32
33
34
35
36
37
38
39
40
41
42
43
44
45
46
47
48
49
50
51
52
53
54
55
56
57
58
59
60
61
62
63
64
65
66
67
68
69
70
71
72
73
74
75
76
77
78
79
80
81
82
83
84
85
86
87
88
89
90
91
92package com.test.security.controller;
import org.slf4j.Logger;
import org.slf4j.LoggerFactory;
import org.springframework.security.access.prepost.PreAuthorize;
import org.springframework.security.core.AuthenticationException;
import org.springframework.security.core.context.SecurityContextHolder;
import org.springframework.stereotype.Controller;
import org.springframework.web.bind.annotation.RequestMapping;
import org.springframework.web.bind.annotation.ResponseBody;
import org.springframework.web.bind.annotation.RestController;
import javax.servlet.http.HttpServletRequest;
import javax.servlet.http.HttpServletResponse;
import java.io.IOException;
/**
* @Author:jasoncool
* @Description:
* @Date:创建于上午 09:12 2018/5/23
* @Modified:
*/
@Controller
public class LoginController {
private Logger logger = LoggerFactory.getLogger(LoginController.class);
@RequestMapping("/")
public String showHome() {
String name = SecurityContextHolder.getContext().getAuthentication().getName();
logger.info("当前登陆用户:" + name);
return "home.html";
}
@RequestMapping("/login")
public String showLogin() {
return "login.html";
}
@RequestMapping("/admin")
@ResponseBody
@PreAuthorize("hasRole('ADMIN')")
public String printAdmin() {
return "如果你看见这句话,说明你有ROLE_ADMIN角色";
}
@RequestMapping("/user")
@ResponseBody
@PreAuthorize("hasRole('USER')")
public String printUser(String s) {
System.out.println("~~~~~~~~~~~~~~~~~~~~~~~~~~~~~~~~~~~~~~~: "+s);
return "如果你看见这句话,说明你有ROLE_USER角色";
}
@RequestMapping("/admin/r")
@ResponseBody
public String printAdminR() {
return "如果你看见这句话,说明你访问/admin路径具有r权限";
}
@RequestMapping("/admin/u")
@ResponseBody
public String printAdminU() {
return "如果你看见这句话,说明你访问/admin路径具有update权限";
}
@RequestMapping("/admin/d")
@ResponseBody
public String printAdminD() {
return "如果你看见这句话,说明你访问/admin路径具有delete权限";
}
@RequestMapping("/admin/c")
@ResponseBody
public String printAdminC() {
return "如果你看见这句话,说明你访问/admin路径具有c权限";
}
@RequestMapping("/login/error")
public void loginError(HttpServletRequest request, HttpServletResponse response) {
response.setContentType("text/html;charset=utf-8");
AuthenticationException exception =
(AuthenticationException)request.getSession().getAttribute("SPRING_SECURITY_LAST_EXCEPTION");
try {
response.getWriter().write(exception.toString());
}catch (IOException e) {
e.printStackTrace();
}
}
}
新的登录成功界面home.html:1
2
3
4
5
6
7
8
9
10
11
12
13
14
15
16
17<!DOCTYPE html>
<html lang="en">
<head>
<meta charset="UTF-8">
<title>Title</title>
</head>
<body>
<h1>登陆成功</h1>
<a href="/admin">检测ROLE_ADMIN角色</a>
<a href="/user">检测ROLE_USER角色</a>
<a href="/admin/c">检测admin的C权限</a>
<a href="/admin/r">检测admin的R权限</a>
<a href="/admin/u">检测admin的U权限</a>
<a href="/admin/d">检测admin的D权限</a>
<button onclick="window.location.href='/logout'">退出登录</button>
</body>
<!-- </html> -->
新加的查询方法findByAdminUserId,就是根据用户id获取用户拥有的所有权限:1
2
3
4
5
6
7
8<select id="findByAdminUserId" parameterType="java.lang.Long" resultType="com.test.security.entity.SysPermission"> SELECT
p.*
FROM sys_user u
LEFT JOIN sys_user_role sru ON u.id= sru.user_id
LEFT JOIN sys_role r ON sru.role_id=r.id
LEFT JOIN Sys_permission p ON p.role_id =r.id
WHERE u.id=#{userId}
</select>
上边就是通过角色和权限来管理系统的访问范围了,原理在前一章已经写清楚了,剩下的就是通过学习和理解这部分知识后,在将其应用到自己的权限管理中去。
最后再附一篇前辈写的关于他所理解的权限管理的过程,帮助你理解:
启动服务,打开浏览器,输入http://localhost:8080/ThirdSpringSecurity/user/user.jsp,由于有权限限制,会跳转到登录页面,输入user账号和密码(没有采用密文)登录后就可以到user.jsp页面,如果将url改为http://localhost:8080/ThirdSpringSecurity/admin/admin.jsp,会跳转到权限不足的界面。
,验证及授权的过程如下:
当Web服务器启动时,通过Web.xml中对于Spring Security的配置,加载过滤器链,那么在加载MyFilterSecurityInterceptor类时,会注入MyInvocationSecurityMetadataSourceService、MyUserDetailsService、MyAccessDecisionManager类。
该MyInvocationSecurityMetadataSourceService类在执行时会提取数据库中所有的用户权限,形成权限列并循环该权限列表,通过每个权限再从数据库中提取出该权限所对应的资源列表,并将资源(URL)作为key,权限列表作为value,形成Map结构的数据。
当用户登录时,AuthenticationManager进行响应,通过用户输入的用户名和密码,然后再根据用户定义的密码算法和盐值等进行计算并和数据库比对,当正确时通过验证。此时MyUserDetailsService进行响应,根据用户名从数据库中提取该用户的权限列表,组合成UserDetails供Spring Security使用。
当用户点击某个功能时,触发MyAccessDecisionManager类,该类通过decide方法对用户的资源访问进行拦截。用户点击某个功能时,实际上是请求某个URL或Action, 无论.jsp也好,.action或.do也好,在请求时无一例外的表现为URL。还记得第2步时那个Map结构的数据吗? 若用户点击了”login.action”这个URL之后,那么这个URL就跟那个Map结构的数据中的key对比,若两者相同,则根据该url提取出Map结构的数据中的value来,这说明:若要请求这个URL,必须具有跟这个URL相对应的权限值。这个权限有可能是一个单独的权限,也有可能是一个权限列表,也就是说,一个URL有可能被多种权限访问。
那好,我们在MyAccessDecisionManager类的decide这个方法里,将通过URL取得的权限列表进行循环,然后跟第3步中登录的用户所具有的权限进行比对,若相同,则表明该用户具有访问该资源的权利。 不大明白吧? 简单地说, 在数据库中我们定义了访问“LOGIN”这个URL必须是具有ROLE_ADMIN权限的人来访问,那么,登录用户恰恰具有该ROLE_ADMIN权限,两者的比对过程中,就能够返回TRUE,可以允许该用户进行访问。就这么简单!
不过在第2步的时候,一定要注意,MyInvocationSecurityMetadataSoruceService类的loadResourceDefine()方法中,形成以URL为key,权限列表为value的Map时,要注意key和Value的对应性,避免Value的不正确对应形成重复,这样会导致没有权限的人也能访问到不该访问到的资源。
还有getAttributes()方法,要有 url.indexOf(“?”)这样的判断,要通过判断对URL特别是Action问号之前的部分进行匹配,防止用户请求的带参数的URL与你数据库中定义的URL不匹配,造成访问拒绝!