Android 9 Activity的加载和显示

起因

昨天被人问起Activity的启动过程,我一阵心虚,说实话,N年前看过一回别人写的文章,但是自己从来没有跟着源码去研究过Activity的启动过程,所以别人问到后,我只能把从PhoneWindow到DecorView到SetContentView到ViewRootImpl调用performTraversals()方法,再调用其内部的performMeasure()、performLayout()、performDraw(),从而将布局文件绘制并加载到父类为FrameLayout的DecorView上,这个过程虽然没什么打错,但是这个其实只是View的绘制流程分支,与Activity的界面加载有部分重合,真正的Activity启动后,界面加载的流程是要比这个复杂的,怀着惭愧的心情,今天赶紧打开AndroidStudio,从源码开始,一点一点的扣整个启动过程。

不过这里先说一下,我无法从Activity的StartActivity()方法开始讲,因为这部分内容特别多,而且相当复杂,我还没有完全吃透,所以我的源码分析过程是从ActivityThread的StartActivityNow开始讲解并分析的,如果这个过程很熟悉,只是为了看前半部分的朋友,可以转战到这篇文章下:

(Android 9.0)Activity启动流程源码分析

过程

现在开始分析,首先打开android.app.ActivityThread类,找到startActivityNow()

1
2
3
4
5
6
7
8
package android.app.ActivityThread

public final Activity startActivityNow(Activity parent, String id,
Intent intent, ActivityInfo activityInfo, IBinder token, Bundle state,
Activity.NonConfigurationInstances lastNonConfigurationInstances)
{

...
return performLaunchActivity(r, null /* customIntent */);
}

这个方法主要的作用就是初始化一些参数后,并调用同类的performLaunchActivity()

1
2
3
4
5
6
7
8
9
10
11
12
13
14
15
16
17
18
19
20
21
22
package android.app.ActivityThread
private Activity performLaunchActivity(ActivityClientRecord r, Intent customIntent) {

...
Activity activity = null;
try{
...
activity = mInstrumentation.newActivity(cl, component.getClassName(), r.intent);
...
}
activity.attach(appContext, this, getInstrumentation(), r.token,
r.ident, app, r.intent, r.activityInfo, title, r.parent,
r.embeddedID, r.lastNonConfigurationInstances, config,
r.referrer, r.voiceInteractor, window, r.configCallback);

...
if (r.isPersistable()) {
mInstrumentation.callActivityOnCreate(activity, r.state, r.persistentState);
} else {
mInstrumentation.callActivityOnCreate(activity, r.state);
}
...
}

首先第7行,先创建一个activity的实例;

然后第10行调用这个activiy实例的attach方法;

然后第16行开始,通过判断是否启用了PersistableBundle,来判断Instrumentation对象mInstrumentation调用哪个Activity的onCreate()方法,不了解PersistableBundle的可以看这篇文章:

android-1.0-四大组件-PersistableBundle

这里主要看一下attach方法:

1
2
3
4
5
6
7
8
9
10
11
12
13
14
15
16
17
18
19
20
21
22
23
24
package android.app.Activity;
final void attach(Context context, ActivityThread aThread,
Instrumentation instr, IBinder token, int ident,
Application application, Intent intent, ActivityInfo info,
CharSequence title, Activity parent, String id,
NonConfigurationInstances lastNonConfigurationInstances,
Configuration config, String referrer, IVoiceInteractor voiceInteractor,
Window window, ActivityConfigCallback activityConfigCallback)
{

...
mWindow = new PhoneWindow(this, window, activityConfigCallback);
mWindow.setWindowControllerCallback(this);
mWindow.setCallback(this);
mWindow.setOnWindowDismissedCallback(this);
...
mWindow.setWindowManager(
(WindowManager)context.getSystemService(Context.WINDOW_SERVICE),
mToken, mComponent.flattenToString(),
(info.flags & ActivityInfo.FLAG_HARDWARE_ACCELERATED) != 0);
if (mParent != null) {
mWindow.setContainer(mParent.getWindow());
}
mWindowManager = mWindow.getWindowManager();
...
}

要了解这里,首先要了解一下Activity的组成结构:

logo

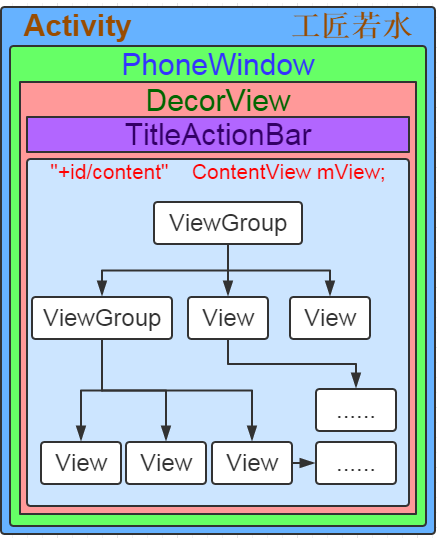
一个Activity的内部包含一个PhoneWindow,PhoneWindow有包含一个DecorView,DecorView其实就是一个FrameLayout的子类,它的内部又包含了TitleActionBar和ContentView,而attach这个方法,其中一个重要目的就是初始化PhoneWindow对象。

现在回到源码部分,上面这个方法,我罗列出的代码主要做了三件事:

1.将Activity.mWindow对象初始化

2.给mWindow设置WindowManager

3.给mWindowManager赋值。

好了,attach方法看完后,我们回到performLaunchActivity方法里,现在该mInstrumentation调用callActivityOnCreate方法了:

1
2
3
4
5
6
package com.app.Instrumentation;
public void callActivityOnCreate(Activity activity, Bundle icicle) {
prePerformCreate(activity);
activity.performCreate(icicle);
postPerformCreate(activity);
}

这里我们主要看activity.performCreate(icicle);这行代码,进入performCreate方法:

1
2
3
4
5
6
7
8
package com.app.Activity; 
final void performCreate(Bundle icicle, PersistableBundle persistentState) {
if (persistentState != null) {
onCreate(icicle, persistentState);
} else {
onCreate(icicle);
}
}

最后发现,执行的就是onCreate方法,而我们写Activity方法的时候,一般都会写一个setContentView(layoutId)来设置界面布局,这时我们再看看setContentView方法:

1
2
3
4
5
package com.app.Activity; 
public void setContentView(@LayoutRes int layoutResID) {
getWindow().setContentView(layoutResID);
initWindowDecorActionBar();
}

这个方法其实做两件事,第一件事是调用getWindow()的setContentView方法,而getWindow()返回的是一个android.app.Window对象,这个对象就是刚刚在attach()中赋值的mWindow成员变量。

后面的initWindowDecorActionBar方法看名字就是初始化DecorView的ActionBar,这也印证了前面我们讲的Activity的框架结构,这个分支就走到这里,我们还是继续看getWindow().setContentView,由于Window是一个抽象类,而Window的setContentView方法其实是一个抽象方法,并没有具体的实现,所以我们要看的是window的子类:PhoneWindowsetContentView方法:

1
2
3
4
5
6
7
8
9
10
11
12
13
14
15
16
17
18
19
20
21
22
23
24
25
26
27
28
29
30
package com.android.internal.policy.PhoneWindow;

@Override
public void setContentView(int layoutResID) {
// Note: FEATURE_CONTENT_TRANSITIONS may be set in the process of installing the window
// decor, when theme attributes and the like are crystalized. Do not check the feature
// before this happens.
if (mContentParent == null) {
installDecor();
} else if (!hasFeature(FEATURE_CONTENT_TRANSITIONS)) {
mContentParent.removeAllViews();
}

if (hasFeature(FEATURE_CONTENT_TRANSITIONS)) {
view.setLayoutParams(params);
final Scene newScene = new Scene(mContentParent, view);
transitionTo(newScene);
} else {
mLayoutInflater.inflate(layoutResID, mContentParent);
//如果调用的是同类构造方法:setContentView(View view, ViewGroup.LayoutParams params)的话
//则这里的代码是:mContentParent.addView(view, params);
}
mContentParent.requestApplyInsets();
final Callback cb = getCallback();
if (cb != null && !isDestroyed()) {
cb.onContentChanged();
}
mContentParentExplicitlySet = true;
...
}

知识点:FEATURE_CONTENT_TRANSITIONS是标记当前内容加载有没有使用过渡动画,也就是转场动画。

首先我们注意一个变量,mContentParent是一个ViewGroup,而学过自定义View的同学,肯定知道ViewGroup就是FrameLayout,LinearLayout,RelativeLayout等布局文件的父类,所以这里有一个执行判断就是,如果mContentParent不为空,并且没有过度动画就执行mContentParent.removeAllViews();来清理界面,之后通过判断,没有过渡动画后,给mContentParent这个ViewGroup中添加view和布局文件。

现在我们来看看installDecor方法:

1
2
3
4
5
6
7
8
9
10
11
12
13
14
package com.android.internal.policy.PhoneWindow; 
private void installDecor() {
...
if (mDecor == null) {
mDecor = generateDecor(-1);
...
} else {
mDecor.setWindow(this);
}
if (mContentParent == null) {
mContentParent = generateLayout(mDecor);
...
}
}

上面的方法主要做的其实就是初始化DecorView,并将DecorView和PhoneWindow进行关联,并初始化mContentParent.

看看generateDecor方法:

1
2
3
4
5
6
7
8
9
10
11
12
13
14
15
16
17
18
19
20
21
package com.android.internal.policy.PhoneWindow;
protected DecorView generateDecor(int featureId) {
// System process doesn't have application context and in that case we need to directly use
// the context we have. Otherwise we want the application context, so we don't cling to the
// activity.
Context context;
if (mUseDecorContext) {
Context applicationContext = getContext().getApplicationContext();
if (applicationContext == null) {
context = getContext();
} else {
context = new DecorContext(applicationContext, getContext());
if (mTheme != -1) {
context.setTheme(mTheme);
}
}
} else {
context = getContext();
}
return new DecorView(context, featureId, this, getAttributes());
}

这里注意一下最后new DecorView的时候传入了this,这就说明DecorView与PhoneWindow确实关联了,并返回了一个DecorView的实例。

我们再看看generateLayout方法:

1
2
3
4
5
6
7
8
9
10
11
12
13
14
15
package com.android.internal.policy.PhoneWindow;
protected ViewGroup generateLayout(DecorView decor) {
...
layoutResource = R.layout.screen_title;
...
mDecor.startChanging();
mDecor.onResourcesLoaded(mLayoutInflater, layoutResource);
ViewGroup contentParent = (ViewGroup)findViewById(ID_ANDROID_CONTENT);
if (contentParent == null) {
throw new RuntimeException("Window couldn't find content container view");
}
...
mDecor.finishChanging();
return contentParent;
}

这个方法很长,注意看onResourcesLoaded方法:

1
2
3
4
5
6
7
8
9
10
11
12
13
14
15
16
17
18
19
20
21
22
23
24
if (mBackdropFrameRenderer != null) {
loadBackgroundDrawablesIfNeeded();
mBackdropFrameRenderer.onResourcesLoaded(
this, mResizingBackgroundDrawable, mCaptionBackgroundDrawable,
mUserCaptionBackgroundDrawable, getCurrentColor(mStatusColorViewState),
getCurrentColor(mNavigationColorViewState));
}

mDecorCaptionView = createDecorCaptionView(inflater);
final View root = inflater.inflate(layoutResource, null);
if (mDecorCaptionView != null) {
if (mDecorCaptionView.getParent() == null) {
addView(mDecorCaptionView,
new ViewGroup.LayoutParams(MATCH_PARENT, MATCH_PARENT));
}
mDecorCaptionView.addView(root,
new ViewGroup.MarginLayoutParams(MATCH_PARENT, MATCH_PARENT));
} else {

// Put it below the color views.
addView(root, 0, new ViewGroup.LayoutParams(MATCH_PARENT, MATCH_PARENT));
}
mContentRoot = (ViewGroup) root;
initializeElevation();

细节太多就不细说了,这个方法主要是创建mDecorCaptionView,然后将传递进来的布局文件inflate到这个DecorView中去。

再回到generateLayout方法,ViewGroup contentParent = (ViewGroup)findViewById(ID_ANDROID_CONTENT);
而ID_ANDROID_CONTENT的常量值就是:com.android.internal.R.id.content;

然后根据:layoutResource = R.layout.screen_title;我们打开此布局文件:

1
2
3
4
5
6
7
8
9
10
11
12
13
14
15
16
17
18
19
20
21
22
23
24
25
26
27
28
29
30
<?xml version="1.0" encoding="utf-8"?>
<LinearLayout xmlns:android="http://schemas.android.com/apk/res/android"
android:orientation="vertical"
android:fitsSystemWindows="true">

<!-- Popout bar for action modes -->
<ViewStub android:id="@+id/action_mode_bar_stub"
android:inflatedId="@+id/action_mode_bar"
android:layout="@layout/action_mode_bar"
android:layout_width="match_parent"
android:layout_height="wrap_content"
android:theme="?attr/actionBarTheme" />

<FrameLayout
android:layout_width="match_parent"
android:layout_height="?android:attr/windowTitleSize"
style="?android:attr/windowTitleBackgroundStyle">

<TextView android:id="@android:id/title"
style="?android:attr/windowTitleStyle"
android:background="@null"
android:fadingEdge="horizontal"
android:gravity="center_vertical"
android:layout_width="match_parent"
android:layout_height="match_parent" />

</FrameLayout>
<FrameLayout android:id="@android:id/content"
android:layout_width="match_parent"
android:layout_height="0dip"
android:layout_weight="1"
android:foregroundGravity="fill_horizontal|top"
android:foreground="?android:attr/windowContentOverlay" />

</LinearLayout>

发现最下面的FrameLayout的id属性就是android:id=”@android:id/content”,也就是说这个FrameLayout其实就是我们的变量contentParent

最后放一个前辈对于DecorView的总结:

综合以上的探究,加上自己的一些思考和猜测。对PhoneWindow做一下小小的总结:

1.一个Activity对应着一个PhoneWindow对象,是一对一的关系,如果从Activity A启动到Activity B,那么Activity B会创建一个自己的PhoneWindow对象。

2.PhoneWindow管理着整个屏幕的内容,不包括屏幕最顶部的系统状态条。所以,PhoneWindow或者Window是与应用的一个页面所相关联。

3.PhoneWindow同时管理着ActionBar和下面的内容主题,setContentView()方法是用来设置内容主体的,而setTitle()等其他方法就是操作ActionBar的,Window中定义的requestFeature()等方法,有很多与ActionBar属性相关的设置。另外这些方法都是公有方法,显然是为了给客户端程序员调用的,也进一步佐证了这些操作的意义与作用。

4.PhoneWindow自己并不是一个视图(View),它的成员变量mDecor才是整个界面的视图,mDecor是在generateLayout()的时候被填充出来的,而actionBar和contentParent两个视图都是通过findViewById()直接从mDecor中获取出来的。

讲到这里,算是把方法installDecor讲完了,现在继续回到代码块:com.android.internal.policy.PhoneWindow的setContentView中去继续从installDecor方法往下看,mContentParent.removeAllViews();简单的说过了,这里就不复述了,之后PhoneWindow类的setContentView方法最后通过调用mLayoutInflater.inflate(layoutResID, mContentParent);或者mContentParent.addView(view, params);将我们的xml或者java View插入到了mContentParent(id为content的FrameLayout对象)ViewGroup中,最后setContentView还会调用一个Callback接口的成员函数onContentChanged来通知对应的Activity组件视图内容发生了变化。

现在重新放一下setContentView这个代码段:

1
2
3
4
5
6
7
8
9
10
11
12
13
14
15
16
17
18
19
20
21
22
23
24
25
26
27
28
29
30
package com.android.internal.policy.PhoneWindow;

@Override
public void setContentView(int layoutResID) {
// Note: FEATURE_CONTENT_TRANSITIONS may be set in the process of installing the window
// decor, when theme attributes and the like are crystalized. Do not check the feature
// before this happens.
if (mContentParent == null) {
installDecor();
} else if (!hasFeature(FEATURE_CONTENT_TRANSITIONS)) {
mContentParent.removeAllViews();
}

if (hasFeature(FEATURE_CONTENT_TRANSITIONS)) {
view.setLayoutParams(params);
final Scene newScene = new Scene(mContentParent, view);
transitionTo(newScene);
} else {
mLayoutInflater.inflate(layoutResID, mContentParent);
//如果调用的是同类构造方法:setContentView(View view, ViewGroup.LayoutParams params)的话
//则这里的代码是:mContentParent.addView(view, params);
}
mContentParent.requestApplyInsets();
final Callback cb = getCallback();
if (cb != null && !isDestroyed()) {
cb.onContentChanged();
}
mContentParentExplicitlySet = true;
...
}

注意最后几行代码,是由Callback的实例对象调用的onContentChanged方法,进入Callback的源码我们得知,Callback就是定义在抽象类Window中的一个接口,而getCallback()也仅仅是获取Callback接口的实例,但是这个Callback具体在哪里实现的,我们还得继续查,这里分享一下我的查询方式,我是通过在对应接口上按Ctrl+T的方式罗列出该接口的实现类,如下:

logo

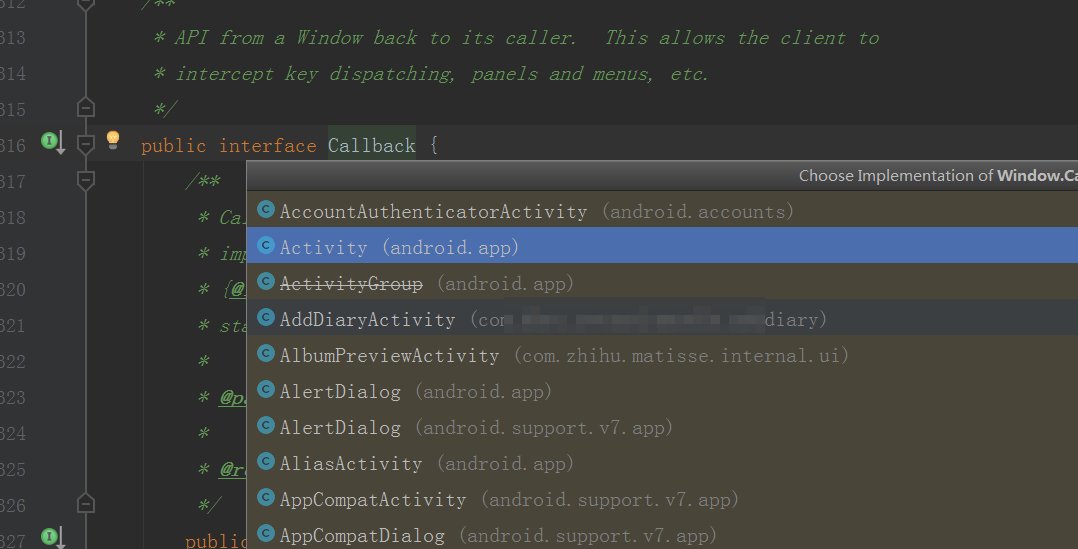
这时我们就注意到了,一个亲切的家伙就出现在我们面前了, Activity呀!对呀,如果PhoneWindow没有实现这个接口,那么作为组合类的Activity应该就会实现呀,而且我们回忆一下Activity的attach方法,呃,不用回忆了,直接贴再贴一次源码:

1
2
3
4
5
6
7
8
9
10
11
12
13
14
15
16
17
18
19
 package android.app.Activity;
final void attach(Context context, ActivityThread aThread,
Instrumentation instr, IBinder token, int ident,
Application application, Intent intent, ActivityInfo info,
CharSequence title, Activity parent, String id,
NonConfigurationInstances lastNonConfigurationInstances,
Configuration config, String referrer, IVoiceInteractor voiceInteractor,
Window window, ActivityConfigCallback activityConfigCallback)
{

attachBaseContext(context);
mFragments.attachHost(null /*parent*/);

mWindow = new PhoneWindow(this, window, activityConfigCallback);
mWindow.setWindowControllerCallback(this);
mWindow.setCallback(this);
mWindow.setOnWindowDismissedCallback(this);
mWindow.getLayoutInflater().setPrivateFactory(this);
....

}

注意,mWindow.setCallback(this);这行代码,这个this不就代表的是Activity本身吗?那么cb.onContentChanged();方法不就是Activity的onContentChanged()方法吗?我们看一下:

1
2
3
package android.app.Activity;
public void onContentChanged() {
}

Activity的onContentChanged()是一个空方法,这就是说,etContentView()或者addContentView()方法执行完毕时就会调用该方法,那么我们知道这个逻辑后,以后有什么布局二次变化的需求后,就可以将组件初始化的代码,如:findViewById()或者一些参数的初始化等业务代码放在我们App对应的Activity重写的onContentChanged()方法中去,让系统帮忙回调。

现在来总结一下setContentView做的事:

创建一个DecorView的对象mDecor,该mDecor对象将作为整个应用窗口的根视图。

依据Feature等style theme创建不同的窗口修饰布局文件,并且通过findViewById获取Activity布局文件该存放的地方(窗口修饰布局文件中id为content的FrameLayout)。

将Activity的布局文件添加至id为content的FrameLayout内。

题目叫做Activity的加载和显示,前面讲的都是Activity的加载,现在讲讲Activity的显示吧,至于为什么会是这个调用顺序或执行过程,那个需要单开一篇文章细说,这里只分析具体的加载和显示的源码过程,现在我们来看Activity中的handleResumeActivity方法:

1
2
3
4
5
6
7
8
9
10
11
12
13
14
15
16
17
18
19
20
21
22
23
24
25
26
27
28
29
30
31
32
33
34
35
36
37
38
39
40
41
42
43
44
package android.app.ActivityThread;
@Override
public void handleResumeActivity(IBinder token, boolean finalStateRequest, boolean isForward,
String reason)
{

final ActivityClientRecord r = performResumeActivity(token, finalStateRequest, reason);
if (r == null) {
// We didn't actually resume the activity, so skipping any follow-up actions.
return;
}
...
if (r.window == null && !a.mFinished && willBeVisible) {
r.window = r.activity.getWindow();
View decor = r.window.getDecorView();
decor.setVisibility(View.INVISIBLE);
ViewManager wm = a.getWindowManager();
WindowManager.LayoutParams l = r.window.getAttributes();
a.mDecor = decor;
l.type = WindowManager.LayoutParams.TYPE_BASE_APPLICATION;
l.softInputMode |= forwardBit;
if (r.mPreserveWindow) {
a.mWindowAdded = true;
r.mPreserveWindow = false;
// Normally the ViewRoot sets up callbacks with the Activity
// in addView->ViewRootImpl#setView. If we are instead reusing
// the decor view we have to notify the view root that the
// callbacks may have changed.
ViewRootImpl impl = decor.getViewRootImpl();
if (impl != null) {
impl.notifyChildRebuilt();
}
}
if (a.mVisibleFromClient) {
if (!a.mWindowAdded) {
a.mWindowAdded = true;
wm.addView(decor, l);
} else {
// The activity will get a callback for this {@link LayoutParams} change
// earlier. However, at that time the decor will not be set (this is set
// in this method), so no action will be taken. This call ensures the
// callback occurs with the decor set.
a.onWindowAttributesChanged(l);
}
}
...

performResumeActivity()这个方法追到底,其主要就是Instrumentation调用了Acitivy的onResume()方法,我们了解就好,然后主要要看的是wm.addView(decor, l);,这里就是要动真格的了,我们继续往下追:

1
2
3
4
5
6
7
8
9
10
11
12
13
14
15
16
17
package android.view;
public interface ViewManager
{

/**
* Assign the passed LayoutParams to the passed View and add the view to the window.
* <p>Throws {@link android.view.WindowManager.BadTokenException} for certain programming
* errors, such as adding a second view to a window without removing the first view.
* <p>Throws {@link android.view.WindowManager.InvalidDisplayException} if the window is on a
* secondary {@link Display} and the specified display can't be found
* (see {@link android.app.Presentation}).
* @param view The view to be added to this window.
* @param params The LayoutParams to assign to view.
*/

public void addView(View view, ViewGroup.LayoutParams params);
public void updateViewLayout(View view, ViewGroup.LayoutParams params);
public void removeView(View view);
}

addView是接口ViewManager的一个方法,但是我们很诧异的是wm没记错的话应该是windowManager的实例啊,怎么成了ViewManager了?我们看一下handleResumeActivity的这行代码:

1
ViewManager wm = a.getWindowManager();

通过追踪这个方法的调用,发现其实这里的设计是这样的:

1
2
3
4
5
package android.view;
@SystemService(Context.WINDOW_SERVICE)
public interface WindowManager extends ViewManager {
...
}

WindowManager接口继承了ViewManager接口,从而在加载View时就使用了ViewManager中的addView方法,现在可以知道的是addView只是一个抽象方法,我们需要找到WindowManager的实现类,查看addView的源码而WindowManagerImpl就是WindowManager的实现类,我们查看这个类的addView方法:

1
2
3
4
5
6
7
8
9
10
11
package android.view;
public final class WindowManagerImpl implements WindowManager {
private final WindowManagerGlobal mGlobal = WindowManagerGlobal.getInstance();
...
@Override
public void addView(@NonNull View view, @NonNull ViewGroup.LayoutParams params) {
applyDefaultToken(params);
mGlobal.addView(view, params, mContext.getDisplay(), mParentWindow);
}
...
}

其实本质上调用的是WindowManagerGlobal的addView方法,我们进去看一下:

1
2
3
4
5
6
7
8
9
10
11
package android.view;
public final class WindowManagerGlobal {
public void addView(View view, ViewGroup.LayoutParams params,
Display display, Window parentWindow)
{

...
root = new ViewRootImpl(view.getContext(), display);
...
root.setView(view, wparams, panelParentView);
...
}
}

这段代码主要的一个作用是调用了ViewRootImpl的setView方法,我们继续追踪:

1
2
3
4
5
6
7
8
9
10
11
package android.view.ViewRootImpl;
public void setView(View view, WindowManager.LayoutParams attrs, View panelParentView) {
synchronized (this) {
if (mView == null) {
mView = view;
...
requestLayout();
...
view.assignParent(this);
}
}

首先,此方法会把之前传进来的参数view赋值给mView,mView其实就是handleResumeActivity中的wm.addView时传进来的DecorView,而DecorView又是一个FrameLayout,这里其实就是将setContentView所做的一切初始化操作的DecorView设置成这个Activity的最基础的视图框架,具体见代码:

view.assignParent(this);

然后调用了requestLayout()方法来显示界面内容:

1
2
3
4
5
6
7
8
9
package android.view.ViewRootImpl;
@Override
public void requestLayout() {
if (!mHandlingLayoutInLayoutRequest) {
checkThread();
mLayoutRequested = true;
scheduleTraversals();
}
}

先判断当前线程是不是主线程,然后就调用了scheduleTraversals()方法,继续跟进:

1
2
3
4
5
6
7
8
9
10
11
12
13
14
package android.view.ViewRootImpl;
void scheduleTraversals() {
if (!mTraversalScheduled) {
mTraversalScheduled = true;
mTraversalBarrier = mHandler.getLooper().getQueue().postSyncBarrier();
mChoreographer.postCallback(
Choreographer.CALLBACK_TRAVERSAL, mTraversalRunnable, null);
if (!mUnbufferedInputDispatch) {
scheduleConsumeBatchedInput();
}
notifyRendererOfFramePending();
pokeDrawLockIfNeeded();
}
}

mChoreographer.postCallback(
​ Choreographer.CALLBACK_TRAVERSAL, mTraversalRunnable, null);通过跟进源码得知其本质就是通过handler发送消息,那么我们关注的重点就应该是mTraversalRunnable这个Runnable接口:

1
2
3
4
5
6
7
package android.view.ViewRootImpl;
final class TraversalRunnable implements Runnable {
@Override
public void run() {
doTraversal();
}
}

doTraversal方法看看:

1
2
3
4
5
6
7
8
9
10
11
12
13
14
15
16
17
void doTraversal() {
if (mTraversalScheduled) {
mTraversalScheduled = false;
mHandler.getLooper().getQueue().removeSyncBarrier(mTraversalBarrier);

if (mProfile) {
Debug.startMethodTracing("ViewAncestor");
}

performTraversals();

if (mProfile) {
Debug.stopMethodTracing();
mProfile = false;
}
}
}

继续跟进performTraversals方法:

1
2
3
4
5
6
7
8
9
10
11
12
private void performTraversals() {
int childWidthMeasureSpec = getRootMeasureSpec(mWidth, lp.width);
int childHeightMeasureSpec = getRootMeasureSpec(mHeight, lp.height);
...
// Ask host how big it wants to be
performMeasure(childWidthMeasureSpec, childHeightMeasureSpec);
...
performLayout(lp, mWidth, mHeight);
...
performDraw();
...
}

这个方法的逻辑非常长,反正我是没看完,但是我们可以注意到,这三个方法和两个属性的初始化,其主要作用其实就是对基础的根节点View进行View的初始化操作,也就是我们常说的onMeasure(测量)、onLayout(布局)和onDraw(绘制),而childWidthMeasureSpec和childHeightMeasureSpec主要的作用就是为测量提供测量规格,这里具体的内容可以看我的另一篇文章:Android自定义View的测量过程详解
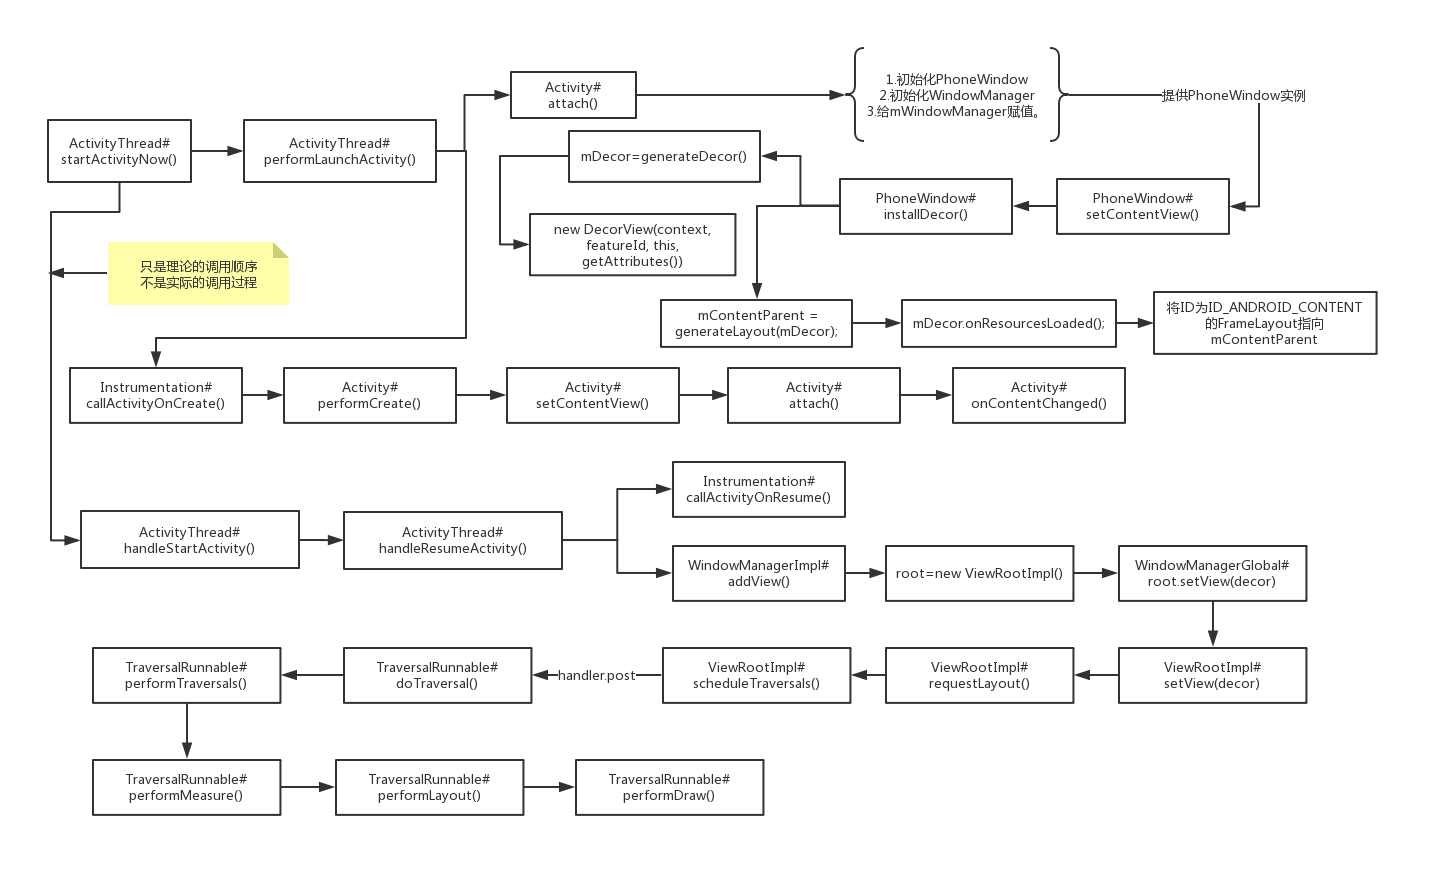
总结

千言万语的总结不如最后绘成一张图来的清晰明了:

logo

热评文章